Search the Community
Showing results for tags 'enemy territory'.
-
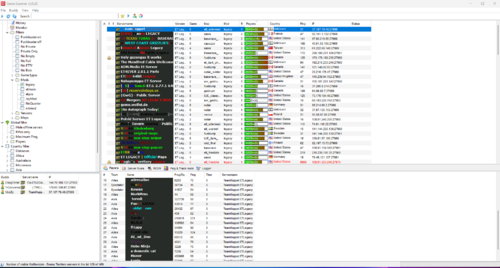
Gamescanner with Masterserver Update View File Hello my Enemy Territory friends! I've read in Discord that new or returning players are looking for servers and that some people don't find the trackbase search very comfortable. Since unfortunately HLSW is no longer looking for servers, I discovered the tool Gamescanner from bdamage http://www.bdamage.se. The tool can: View ETLegacy Servers (Public / Private) buddy list Show other ET mods. View RTCWPro servers I only updated the master servers for ET and RTCW in the gamedfaults file! If anyone still knows master server addresses please contact me https://github.com/b00nji/Gamescanner Submitter m1Ke Submitted 09/02/23 Category Software
-
- Enemy Territory
- Tool
-
(and 1 more)
Tagged with:
-
Version 1.0.0
920 downloads
Hello my Enemy Territory friends! I've read in Discord that new or returning players are looking for servers and that some people don't find the trackbase search very comfortable. Since unfortunately HLSW is no longer looking for servers, I discovered the tool Gamescanner from bdamage http://www.bdamage.se. The tool can: View ETLegacy Servers (Public / Private) buddy list Show other ET mods. View RTCWPro servers I only updated the master servers for ET and RTCW in the gamedfaults file! If anyone still knows master server addresses please contact me https://github.com/b00nji/Gamescanner-
- Enemy Territory
- Tool
-
(and 1 more)
Tagged with:
-

ET BEGINNERS #1 10 reasons you play to much Wolfenstein enemy territory
Bynke posted a topic in ET Discussion
I was wondering if any of you have seen this old nice movie made by clan area42 from Denmark ?- 1 reply
-
- 4
-

-

-

-
- enemy territory
- return to castle wolfenstein
- (and 4 more)
-
"Gamers unite, a mission so clear, Paint your nicks pink, let generosity appear. For each player who takes this colorful stride, A dollar shall be donated 🙏, server's joy will ride. ☀️ Spread the word, let the community know, Changing your nick brings our servers a glow. Let's keep the game alive and grand, With your pink nick, let's lend a hand."
- 54 replies
-
- 30
-

-

-

-
- gamedays
- enemy territory
-
(and 1 more)
Tagged with:
-
@daredevil asked me to create a poll about adrenaline on JAY2. The first question is only for admins and regular players on JAY2. The second and third questions are intended for players of ET server running JAYMOD but all ET players are welcome to answer.
- 161 replies
-
- 5
-

-

-
- adrenaline
- enemy territory
-
(and 1 more)
Tagged with:
-
Hello FellaZ, Lets make ET great again with some amazing movies! 🙂 In case there is some creative guy who wants to create a nice movie.. here you go: To start of, I'm gonna list all the programs you need in order to make movies. Note that some programs are not free. I split this in 3 categories: Recording, editing and encoding. Click on the names to get to download pages. NOTE: To extract .7z files, use 7.ZIP MEGAPACK: Includes EVERYTHING except editing programs (122MB): Moviemaking Megapack by Aciz Recording: Image-ET High Resolution Texture Pack (credits to ag0n) Movie Config Pack (Original pack by ag0n, some settings edited by me) VirtualDub Lagarith Lossless Codec Editing: This section is really up to you, but most people tend to use Sony Vegas and Adobe After Effects. Full version of Sony Vegas costs 600$ and After Effects 20$ per month, so unless you are rich, I would suggest sneaking around a bit and see if there are "free" versions somewhere on the internet... Encoding: Avisynth RipBot264 OR HandBrake OR MeGUI You have 3 options here, skip to the encoding section to read more about these and to choose what's best for you. Part 1 - Preparing your PC for moviemaking To start off, download the required programs and install them. For instructions on how to setup Image ET correctly, read this article on Crossfire written by Madscientist. The article also contains information about Image ET specific CVARS which you can configure in my movie config (they are found in binds.cfg). Note that in the tutorial only etpro is mentioned, but the same method can be used with any mod. After setting up Image ET, replace the original pak0.pk3 from your Image ET folder with the High Resolution Texture pak0.pk3. Then we want to extract our movie config(s) into Image ET/etmain folder. Next we want to setup our graphics card drivers for maximum quality on ET. Before you proceed, make sure your graphics card drivers are up-to-date. NVIDIA GeForce AMD Radeon After you have updated your drivers open up your graphics card control panel by right clicking yoour desktop and clicking "NVIDIA Control Panel" or "Catalyst Control Center" depending on if you have NVIDIA or AMD graphics card. NVIDIA: On the left panel, click on "Manage 3D Settings", then choose "Program Settings" tab and select ET from the dropdown menu. Configure your settings to match mine. Note that changing these settings for will also affect the settings for your normal ET that you play with, so you might want to revert them to defaults after you are done with moviemaking if you think that it will hurt your performance in game. AMD: First, click on "Preferences" on top right and choose "Advanced View". Then, on the left panel, click on "Video", then click on "3D Application Settings" and match your settings with these. Note that this changes settings for every game on your PC so you might want to revert them to default settings after you're dont with moviemaking because they will impact performance. Now that we have configured our PC for moviemaking, we can start recording. Part 2 - Recording After setting up everything, we are ready to record our clip. Open Image ET and load your demo, and use /img_demoseek <value in seconds> to seek to action you want to record. Demoseek skips the amount of seconds forward (or backward) you enter as value, so /img_demoseek 10 would skip 10 seconds forward, while /img_demoseek -5 would skip 5 seconds backwards. After you have found your action you want to record, press F2 to start recording. In binds.cfg, start record is bound on F1 while stop record is bound on F2, but for some reason ET seems to mix them up so that F2 will work as start and F1 as stop. You can open up console and it should say that you have started recording like this. ET will now start taking screenshots X times per seconds, X being the value of /img_captureFPS. Few tips here: If you are planning on doing lots of editing with your clip, try using high /img_captureFPS value such as 120 (allows you to do 400% slow motion still resulting in smooth 30fps on your clip) and using low /img_blur_samples value. If you are not planning to do much slow motion on your clip, use lower /img_captureFPS and higher /img_blur_samples. After you have recorded your clip, press F1 to stop recording and you can exit ET. Now we have a bunch of screenshots saved in Image ET/<mod>/screenshots/<demo name + timestamp>/ folder. To combine these screenshots into editable .avi file, we are going to use VirtualDub. So start up VirtualDub. Once in VirtualDub, go to File -> Open video file (CTRL + O). Navigate to your screeshots folder and import the first screenshot of the image sequence (should be named 0000000000.tga), and the rest of the screenshots will be imported automatically. Now you should have the screenshots open in VirtualDub. You can move the slider to preview your clip if you want (tip: go to View -> Pane layout and tick Auto-size panes so your preview windows will automatically fit your VirtualDub window). Now click on Video -> Frame rate (CTRL + R) and set your Frame Rate to match your /img_captureFPS value. Next, go to Video -> Compression (CTRL + P) and select Lagarith Lossless Codec from the list. Then hit Configure and check the box "Use Multithreading". This will make VirtualDub take benefit of all CPU cores when using Lagarith Lossless Codec making render times lower. Now you might want to save your settings so you don't have to enter them every time you open VirtualDub. Go to File -> Save processing settings (CTRL + S) and save your settings on your preferred location. It's a good idea to name the settings the amount of FPS you are using if you are going to use different FPS on different clips, since FPS is the only setting that is going to change between templates. Now the next time you open VirtualDub, you can go to File -> Load processing settings (CTRL + L) and select your saved template. Now that we are done with our settings, it's time to render the screenshots into .avi file. Go to File -> Save as AVI (F7) and save the file to your preferred location. Rendering speed is affected by your CPU and RAM, but it shouldn't take too long. One feature in VirtualDub that might come handy in VirtualDub is batch rendering. This allows you to put clips into queue and render them consecutively. This is very useful if you record multiple clips before rendering any of them, which I would highly suggest to do as it saves time. To do this, open your video file as you would normally do, enter your settings/load template and go to File -> Queue batch operation -> Save as AVI (CTRL + SHIFT + F7) and save the file to your preferred location. After hitting Save, you notice that the render won't start yet. Now you can go to File -> Close video file (CTRL + W) and open another video file, and just got to File -> Queue batch operation -> Save as AVI to load that into queue as well. To render the clips in the batch queue, go to File -> Job control (F4), hit Start and the files will be rendered to the location(s) you have chosen. So when batch rendering, you will do things like this: CTRL + O -> CTRL + L -> CTRL + SHIFT + F7 -> CTRL + W -> CTRL -> O... and finally F4 and Start. Note that if you are rendering multiple files with same frame rate, you don't have to load processing settings every time. If you are however, you only need to load processing settings when you move from for example 120fps clip into 60fps clip. You can render multiple files with different frame rates, as long as you load correct settings to the clip before you put it into the batch queue. Example: Load 120FPS template -> 120FPS clip -> 120FPS clip -> Load 60FPS template -> 60 FPS clip -> Load 120FPS template -> 120FPS clip etc. I strongly recommend to get used to keyboard shortcuts in VirtualDub as it will save a lot of your time. Now we can use /wav_record to record sound to our clip since avidemo doesn't record sound. So open up ET and play back your demo again. Use /img_motionblur 0 to get rid of motion blur so the clip will play on normal speed. After you are done recording, use /wav_stoprecord to stop recording. Your sound file will be saved to Image ET/<mod>/wav/ folder. Part 3 - Editing REMEMBER: Always render Lagarith Lossless Codec .avi when moving between programs to avoid losing source file quality!!! I will not cover much on this section, since it's really up to you on how you are going to edit your clips. I will show you few things though. Most people use Sony Vegas as their main editing program, and render their project there, sometimes using After Effects to do some special things that cannot be done on Sony Vegas. So I will show you correct project settings for Sony Vegas. Open up Sony Vegas, and go to File -> Properties or hit the Project Video Properties button on top left of the preview window and match your settings with these. About frame rate: YouTube Player is 30 FPS. If you are not planning on uploading your video anywhere for people to download, there is no need to render and edit more than 30 FPS. If you however want to give out download link to your video, then you should set the frame rate to whatever you are planning to render your video on. Most people use 50 or 60 FPS. After you have done editing, it's time to render our product. Go to File -> Render as or hit the Render as button on top left. Select Video for Windows (*.avi), Default Template (Uncompressed) and hit Custom. Now, depending on your final encoding program, these settings vary. Check the final encoding part of this tutorial to help you choose the best solution for you. RipBot264: Copy the exact settings on the screenshots. HandBrake: Select Uncompressed instead of Lagarith Lossless Codec. MeGUI: On audio tab, uncheck the box Include audio and render audio as seperate track. After (or before if you want) you have finished rendering the video, hit Render as again and choose MP3 Audio (*.mp3) and select the template 320 Kbps, CD Transparent Audio, then hit Custom and move the Quality slider to Highest Quality. After editing the settings, you can type a name for the settings on the text field above and hit the Save icon to save your settings as preset. Note that these screenshots are taken from Sony Vegas 10. Depending on your version of Sony Vegas, the options might look a bit different, but the same settings should be available on any version. Now we are ready to do the final MP4 encoding. Part 4 - Final Encoding As I listed on the required programs section in the start of this tutorial, you have 3 options for the final encoding. I will list pros and cons of each program here. Ripbot264: Pros: Simple to use, fast encoding Cons: Worst quality out of the 3 options, somewhat big file size compared to HandBrake and MeGUI HandBrake: Pros: Excellent quality with decent file size Cons: Slow encoding MeGUI: Pros: Best quality out of the 3 options, smallest file size Cons: Even slower encoding than HandBrake, might be quite complicated program to use for the first few times RipBot264 When you first time start up RipBot264, it will check if you have Avisynth, ffdshow, Haali media splitter and Java installed. If it says that something is missing, download them (the program gives download links for each program), install them and restart RipBot264. Once you have RipBot264 open, click on Add on the bottom right and browse to your .avi file. After that RipBot264 will demux the audio stream out of the video, which will take some time depending on how long the video is. After it's done, all you have to do is change CRF value to 16, specify output folder for you file, click Done and click Start, and RipBot264 will start encoding your video. HandBrake When you first time start HandBrake, it updates your presets. After you are in the program, choose your input file by clicking Source -> Video file on top left. Browse to your .avi file. You can ignore the warning window that pops up when you import your video. The Picture, Video Filters, Subtitles and Chapters setting tabs will be left on default settings. For the rest of the tabs, copy the settings on the screenshots. You can save your settings as preset by clicking the Add button on bottom right and giving a name for your settings. After you are done editing the settings, hit Start on top left and HandBrake will start encoding your video. Note that this is 2-pass encode, so it appears that HandBrake is rendering your video twice. MeGUI Start up MeGUI, and go to Tools -> AVS Script Creator. Choose your -avi file by clicking on the ... button near the top field, and browse to your video file. A windows will pop up, choose the furthest option on right, AviSource. A preview window will pop up, you can close that. After that just hit Save, and close the preview window that pops up again. Next, make sure Encoder settings drop down menu says x264: *scratchpad*, and click on Config. First, you want to make a new preset by clicking New at the bottom of the window, and giving your preset a name. Next, tick the box Show advanced settings. Now you want to copy the settings from the screenshots. After configuring the settings, press OK and Yes to save your template. Next, press AutoEncode on bottom right. Select your preferred output destination, check the No Target Size (use profile settings) option and hit Queue. The first time you do this, a windows will popup saying that your colorspace is incorrect. Check the box Don't ask me this again and click Yes. Now MeGUI will start encoding your video. Note that this is 3-pass encode, so it seems that MeGUI is rendering your video 3 times. After the 2nd pass, a window will pop up asking you if you want to overwrite already existing file. Check the box Don't ask me this again and press Yes. The encoding will take long, so prepare to wait. After the encoding is done, go to Tools -> Muxer -> MP4 Muxer. Select the MP4 file you just encoded as Video Input and the MP3 file you rendered earlier on Sony Vegas as Audio Input. Select your desired output folder in Muxed output field. Press Queue, and MeGUI will mux the video with audio. This will take very little time, and you will have your final product ready for YouTube. Video Versions & Camtrace: So that's it. Moviemaking is a very long process if you want to achieve high quality movies. Hope this covers up everything. If you have any questions, feel free to contact me. So this it will look like: Just wanted to share with you, I updated the links and edited some Things! Big thanks to Ag0n, Musashiii and Acizco https://www.crossfire.nu/tutorials/213/moviemaking-a-z
- 5 replies
-
- 8
-

-

-
- Moviemaking
- enemy territory
-
(and 3 more)
Tagged with:
-
15438 downloads
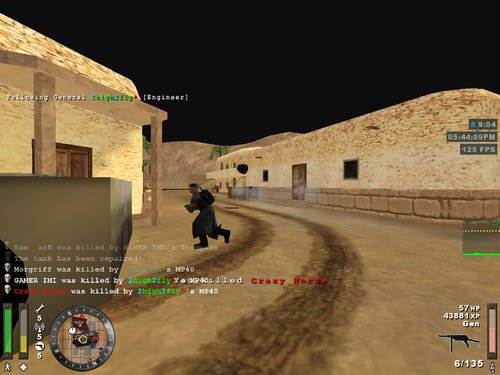
Wolfenstein: Enemy Territory (also referred to as simply Enemy Territory, ET, or W:ET) is a free and open source multiplayer first-person shooter video game. System requirements 600 MHz CPU 128 MB RAM 32 MB OpenGL graphics card 56.6k Modem/LAN Wolfenstein: Enemy Territory is a downloadable, free-to-play multiplayer game in which players wage war as Axis or Allies in team-based combat. It's a team game; you will win or fall along with your comrades. The only way to complete the objectives that lead to victory is by cooperation, with each player covering their teammates and using their class special abilities in concert with the others. Featuring multiplayer support for up to 32 players, Wolfenstein: Enemy Territory is the ultimate test of communication and teamwork on the battlefield. Players join the fray as one of five distinct character classes each with unique combat abilities. The Covert Ops can steal the uniforms of fallen enemies and perform covert reconnaissance behind enemy lines, while Engineers can plant and diffuse land mines as well as construct battlefield structures including bridges, guard towers and forward operations bases in the midst of combat to gain advantages for their team. Medics provide health and revive fallen teammates, as Field Ops use their binoculars to mark enemy positions for a Soldier's mortar barrage. Each Axis or Allies team can divide itself into smaller fire teams for quick and easy communication using an intuitive messaging system and dynamic command map of the entire battlefield. No longer does winning a single battle win the war. In Wolfenstein: Enemy Territory multiple objective-based scenarios are linked together over the course of three maps to form a campaign where teams struggle for successive victories. Throughout a campaign, players gain experience in categories like battle sense and light weapons as well as their class specific abilities, each of which persist and accumulate over the course of the campaign. As players reach higher levels in each of the seven categories they are awarded with enhanced abilities as well as battlefield promotions that are represented as ranks on each players helmet. The 28 enhanced abilities range from higher ammunition capacity and faster power-bar recharge times, to the ability to see land mines, revive fallen teammates at full health or use a machinegun instead of a pistol as your secondary weapon. In addition to objective and campaign modes, Wolfenstein: Enemy Territory introduces a team-based Last-Man-Standing game mode, where squad-mates cooperate to ensure their team has the last surviving man on the battlefield. Additionally, Splash Damage has created a new terrain foliage system that allows players to hide or take a sniper position in the cover of long grass or snowy mountaintops. With numerous game modes, epic campaigns, persistent character progression and an arsenal of overwhelming firepower including land mines, mortars, mobile MG-42s and a silenced sniper rifle, Wolfenstein: Enemy Territory will have players battling in the trenches for hours. Download the game, install it and fire up ET.exe and join server. You can open the console using "~" key and directly connect to server using: \connect jay1.clan-fa.com You can also find our other community servers here: Fearless Assassins Gaming Community Enemy Territory Servers -
Version Final version
694 downloads
Converted by 'Kragle' - full copyright goes to ID SOFTWARE and QUAKE 3 for this map. i converted it into et and added weapons about and ammo and health cabinets, plus i made most of the map cushion so you dont fall to your death which is slightly modifyed but had to be done. Read : http://www.smpclan.com/modules.php?name=Forums&file=viewtopic&p=2730#2730 for more info. copyright 2006 - id / quake 3 software & designers this map may be used for study but cannot change its design in anyway. this map may also be going in 999gamma 2. but ive not desided yet. i may build my own arena with etf textures and other stuff. 2006 |999|'Kragle' WITH THANKS TO: {JUST-ME} |SMP| BAHA Chruker :::::: EDIT MAP ONLY IF YOU KNOW HOW TO MAKE JUMP PADS WORK :::: q3dm17 waypoints.rar -
Dear community, Today I am announcing to you our beta program. TrackBase is seeking users and enthusiasts of its platform and supported games to join together in a team where new ideas will be brought up, discussed and realized. I encourage you all to think of something that you would like to see on TrackBase or report things that shouldn't be kept in future versions. As we are approaching our ten-year-anniversary we as TrackBase want to give back to all the users of our platforms who are still active after all those years. What do you need to do? Join our Discord server at https://discord.gg/dah6x4h and/or text JoNny directly via JoNny#4423 Visit our forums and create a thread in the relevant forum: TrackBase Bugs, Feedback & Feature requests Contact us via pm or email I am looking forward to hearing your ideas and feedback from you! JoNny & The TrackBase Team
- 1 comment
-
- 9
-

-
- trackbase
- enemy territory
-
(and 1 more)
Tagged with:
-
Dear members, guests and tracking enthusiasts, TrackBase is becoming 10 years old today. Paul van der Knaap had published TrackBase as a better tracking alternative on 10th October 2010. A lot has changed since then - except for one: Our love to Enemy Territory and FarCry, and TrackBase of course! 😄 Following changes have been implemented: [ET] Changed the clan ranking method: The rating from all players is taken into account now. [ET] Support for Server URLs has been added. Any server that has .URL filled will feature this url on it server page [ET] Levelshots and Command Maps can now be clicked, the image will open enlarged. [ET] Clan logging has been extended! A lot more actions are now being logged, so abuse is no more option and can always be tracked. [ET] On user request: Map ownership for map creators. Any map publisher may now request ownership over their map. This comes with the feature of being able to edit all the map details and be able to upload new versions that will be published after a review. Go here to see your map ownerships. [ET] An overhaul to the home page. You can see more relevant information to you now on the top (right). Polls and video suggestions have been moved down. You can now switch between the ranklist and TSP toplist. Your favorite server now updates information, so you don't have to refresh and can get the latest player or map information right away. [ET] Introducing "Clan of the day": Every day we are calculating a new clan of the day. This feature is intended to support smaller clans that might not get to the toplist. With a little bit of luck, your clan can be "Clan of the day (COTD)", too. [ET] Not just your home page updates in the background. Also the server information page has been updated accordingly. You won't have to refresh anymore. Additionally, average ping and the NxAC flag has been added. Server monitor URL, server signature URL and server shortcut URL can now be copied to the clipboard with a single click. Also, all servers that have a shortcut will now be linked all over TrackBase with it. No more IDs to remember. Server usage charts have been fixed. [ET] Removed random and best maps when a search is performed. Also you can now re-order the search by your wishes. A few more details are now shown right away. You can vote for a map right from your search. [ET] On user request: Removed the requirement for a minimum of 3 characters when "exact playername" is checked. Also, all results are now shown in a paginated view. You can additionally re-order by your choice. TSP rate and rank has been added to the results. [ET] Since the serverlist and server overview are the most used pages on TrackBase, searching for a server has now also gotten a lot easier. A few more filters have been added. And you can re-order by your choice. [FC] Added the video filebase on popular request. You can submit new YouTube videos for your filebase now. [FC] Fixed a long lasting bug that would not calculcate the awards every day. Now you can at all times see a new award winner! .. and many more bug fixes and stability improvements. Additionally, since TrackBase just turned 10 YEARS today, we were working on more user requests and FOUR new platforms that, however, didn't make it until today. We're working hard to finish them up and roll them out until the end of the year. These are: TrackBase Dashboard - This will be your new starting point where all relevant information will be available, and more. TrackBase Support - This will be a new central place for all support related topics. FAQ, Forms and Tickets included. TrackBase Matches - This will be interesting for all teams that want to play competitively. For all games. Create your team, search for and invite members, find and play matches and see your win statistics. All in one place. TrackBase Statistics - This will be a rather small informational site for all statistics nerds that would like to know more about the data TrackBase is gathering. At last, I want to thank you - our users - for your continued support in TrackBase. Thanks also to all people suggesting features and reporting bugs. Thanks to our beta testers, our premium members and current and past TrackBase staff. It wouldn't have been possible without each and everyone of you! Thank YOU! Finally, I'm gonna impersonate Bernie Sanders and... Please consider supporting TrackBase through a donation, if you love what we are doing! P.S. If you didn't find the feature you were hoping for or have already requested, then don't hesitate to join our Discord server and contact us. We are already working on other already-requested features that didn't make it in time of todays launch. Sincerely, JoNny and the whole TrackBase Team.
-
- 4
-

-

-
- trackbase
- enemy territory
-
(and 1 more)
Tagged with:
-
Complete pk3 cleaner View File Pk3 cleaner for the users who want to remove all custom pk3's. Submitter daredevil Submitted 04/21/20 Category Fearless Assassins Software
-
-
can someone help me 4 et download? need short guidance, i kinda forgot how it goes rlly. what I need to download (2.60 patch b, do I need PB or not anymore (i know it's dead but last time I had to download it idk rlly why), etc.. thnx in advance. 👍
-
I knew I'd die, but it cracks me up imagining their perspective. I have more ET videos on my channel, if anyone is interested.
-
- enemy territory
- funny
-
(and 1 more)
Tagged with:
-
Video tutorial on how to connect - =F|A= servers directly from console - Creating because of master list hack going on. Server IP - Jay1- jay1.clan-fa.com:27960 Jay2- jay2.clan-fa.com:27960 Beginners #1- b1.clan-fa.com:27960 Hardcore - hc.clan-fa.com:27960 silent1 - silent1.clan-fa.com:27960 Beginners #2 - b2.clan-fa.com:27960 NQ1 - nq1.clan-fa.com:27960 NQ2 - nq2.clan-fa.com:27960 NQ3 - nq3.clan-fa.com:27960 ETPRO 1 - etpro1.clan-fa.com:27970 ETPRO 2 - etpro2.clan-fa.com:27970 ETPRO 3 - etpro3.clan-fa.com:27980 easytojay1.mp4
- 20 replies
-
- 6
-

-

-
- enemy territory
- server
-
(and 1 more)
Tagged with:
-
https://gaming.youtube.com/game/UCDUrMJUhCs0NYlXEFoZrB_Q
-
Version v 2.0 2018
852 downloads
For try this CFG copy all files .cfg, on etmain folder copy shortcuts on desktop, right-click on the shortcuts, properties, change the destination letter of ET.exe, and confirm, apply right-click on the shortcuts, run as administrator, after entering the game open the console with the key \ write / exec ETplayer2018 and press enter LIST OF COMMANDS ON THE KEYBOARD bind w "+forward" bind s "+back" bind a "+moveleft" bind d "+moveright" bind q "+leanleft" bind e "+leanright" bind r "+reload" bind f "+activate" bind CTRL "+movedown" bind SHIFT "+sprint" bind c "+prone" seta cg_runpitch "0" seta cg_runroll "0" seta cg_bobup "0" seta cg_bobpitch "0.000" seta cg_bobroll "0" bind F1 "vote yes" bind F2 "vote no" bind F3 "ready" bind F4 "notready" bind Backspace "vstr AxisAllies" bind KP_INS "vstr nextstatus" bind KP_ENTER "mp_fireteamadmin" bind PAUSE "vstr pausetoggle" bind l "openlimbomenu" bind ' "playdead" bind z "weapalt" bind MWHEELUP "weaponbank 3" bind MWHEELDOWN "weaponbank 2" bind 3 "weaponbank 4" bind CAPSLOCK "weaponbank 5" bind SPACE "weaponbank 6" bind 4 "weaponbank 7" bind MOUSE1 "+vstr shooton shootoff" bind MOUSE2 "+moveup" bind MOUSE3 "vstr lenovo" bind ALT "vstr speedjump" Bind 2 "vstr FFE" bind b "+zoom" bind F7 "vstr clock" bind 1 "weaponbank 4;wait 120;+attack;wait 20;-attack;wait 10;kill; forcetapout" bind ENTER "vstr map" bind [ "mapzoomout" bind ] "mapzoomin" bind u "messagemode3" bind y "messagemode2" bind v "mp_quickmessage" bind t "messagemode" bind x "" bind n "r_picmip 3; vid_restart" bind k "VoiceChat taunt2" bind j "VoiceChat song6" bind h "VoiceChat speech70" bind g "VoiceChat song13" bind F9 "vstr crosshair" bind F8 "vstr crosshr" bind F10 "vstr crosshairsize" bind KP_END "vstr fps00" bind KP_DEL "vstr time00" bind KP_PGDN "vstr packets00" bind KP_DOWNARROW "vstr rate00" bind UPARROW "vstr gamma" bind LEFTARROW "vstr fov" bind DOWNARROW "vstr sens" bind . "vstr info" bind RIGHTARROW "vstr sound" bind p "s_volume 0; Echo ^1Sound Mute" bind , "players;; wait 50;toggleconsole" bind m "vstr st" bind TAB "+scores" bind 5 "setspawnpt 0;say_team ^1Spawn 0 ;play sound/menu/select.wav" bind 6 "setspawnpt 1;say_team ^1Spawn 1 ;play sound/menu/select.wav" bind 7 "setspawnpt 2;say_team ^1Spawn 2 ;play sound/menu/select.wav" bind 8 "setspawnpt 3;say_team ^1Spawn 3 ;play sound/menu/select.wav" bind 9 "setspawnpt 4;say_team ^1Spawn 4 ;play sound/menu/select.wav" bind 0 "setspawnpt 5;say_team ^1Spawn 5 ;play sound/menu/select.wav" if you want to change the picmip press the key n good fun !!! by Lenovo -
Lenovo CFG 2018 - 11 April 2018 View File For try this CFG copy all files .cfg, on etmain folder copy shortcuts on desktop, right-click on the shortcuts, properties, change the destination letter of ET.exe, and confirm, apply right-click on the shortcuts, run as administrator, after entering the game open the console with the key \ write / exec ETplayer2018 and press enter LIST OF COMMANDS ON THE KEYBOARD bind w "+forward" bind s "+back" bind a "+moveleft" bind d "+moveright" bind q "+leanleft" bind e "+leanright" bind r "+reload" bind f "+activate" bind CTRL "+movedown" bind SHIFT "+sprint" bind c "+prone" seta cg_runpitch "0" seta cg_runroll "0" seta cg_bobup "0" seta cg_bobpitch "0.000" seta cg_bobroll "0" bind F1 "vote yes" bind F2 "vote no" bind F3 "ready" bind F4 "notready" bind Backspace "vstr AxisAllies" bind KP_INS "vstr nextstatus" bind KP_ENTER "mp_fireteamadmin" bind PAUSE "vstr pausetoggle" bind l "openlimbomenu" bind ' "playdead" bind z "weapalt" bind MWHEELUP "weaponbank 3" bind MWHEELDOWN "weaponbank 2" bind 3 "weaponbank 4" bind CAPSLOCK "weaponbank 5" bind SPACE "weaponbank 6" bind 4 "weaponbank 7" bind MOUSE1 "+vstr shooton shootoff" bind MOUSE2 "+moveup" bind MOUSE3 "vstr lenovo" bind ALT "vstr speedjump" Bind 2 "vstr FFE" bind b "+zoom" bind F7 "vstr clock" bind 1 "weaponbank 4;wait 120;+attack;wait 20;-attack;wait 10;kill; forcetapout" bind ENTER "vstr map" bind [ "mapzoomout" bind ] "mapzoomin" bind u "messagemode3" bind y "messagemode2" bind v "mp_quickmessage" bind t "messagemode" bind x "" bind n "r_picmip 3; vid_restart" bind k "VoiceChat taunt2" bind j "VoiceChat song6" bind h "VoiceChat speech70" bind g "VoiceChat song13" bind F9 "vstr crosshair" bind F8 "vstr crosshr" bind F10 "vstr crosshairsize" bind KP_END "vstr fps00" bind KP_DEL "vstr time00" bind KP_PGDN "vstr packets00" bind KP_DOWNARROW "vstr rate00" bind UPARROW "vstr gamma" bind LEFTARROW "vstr fov" bind DOWNARROW "vstr sens" bind . "vstr info" bind RIGHTARROW "vstr sound" bind p "s_volume 0; Echo ^1Sound Mute" bind , "players;; wait 50;toggleconsole" bind m "vstr st" bind TAB "+scores" bind 5 "setspawnpt 0;say_team ^1Spawn 0 ;play sound/menu/select.wav" bind 6 "setspawnpt 1;say_team ^1Spawn 1 ;play sound/menu/select.wav" bind 7 "setspawnpt 2;say_team ^1Spawn 2 ;play sound/menu/select.wav" bind 8 "setspawnpt 3;say_team ^1Spawn 3 ;play sound/menu/select.wav" bind 9 "setspawnpt 4;say_team ^1Spawn 4 ;play sound/menu/select.wav" bind 0 "setspawnpt 5;say_team ^1Spawn 5 ;play sound/menu/select.wav" if you want to change the picmip press the key n good fun !!! by Lenovo Submitter Cquattro Submitted 04/11/18 Category Player Configs
-
- 1
-

-
Version 1.0
1968 downloads
Note : Tested on W:ET 2.60 Setup - Windows 10 (32 bit) Note : Tested on W:ET 2.60 Setup - Windows 8.1 (32 bit) Note : Tested on W:ET 2.60 Setup - Windows 7 [ Home Edition /Ultimate /Professional ] (32 bit) Note : Tested on W:ET 2.60 Setup - Windows XP [ Professional ] (32 bit) Note : Tested on W:ET 2.60 Setup - Linux ( Ubuntu ) (64 bit) About : This File will transform your ET 2.60 Setup To ET 2.60b without losing Anything ! Procedure : Download "Enemy Territory 2.60b patch" and Extract it. After that Open the Folder and Open Linux for Linux Users / MacOSx for MacOS Users / win32 for Windows Users. For Windows Users : Copy and Paste "ET" and "ETDED" in your Game Root Folder. When it says Replace press Yes For Linux Users : Copy and Paste "ET.x86" and "ETDED.x86" in your Game Root Folder. For MacOS Users : Copy Everything Under "Wolfenstein ET.app" and Past in your Game Root Folder. When it says Replace press Yes- 1 review
-
- enemy territory
- patch
-
(and 1 more)
Tagged with:
-
Hey, use this if you need to know what numbers/letters/symbols correlate with which colors without having to check through all of them. bind / "echo ^!!^@@^##^$$^%%^&&^**^((^))^qq^ww^ee^rr^tt^yy^uu^ii^oo^pp^aa^ss^dd^ff^gg^hh^jj^kk^ll^zz^xx^cc^vv^bb^nn^mm^11^22^33^44^55^66^77^88^99^00"
- 8 replies
-
- 4
-

-
- colors
- enemy territory
- (and 4 more)
-
Q3dm17 for ET and waypoints View File Converted by 'Kragle' - full copyright goes to ID SOFTWARE and QUAKE 3 for this map. i converted it into et and added weapons about and ammo and health cabinets, plus i made most of the map cushion so you dont fall to your death which is slightly modifyed but had to be done. Read : http://www.smpclan.com/modules.php?name=Forums&file=viewtopic&p=2730#2730 for more info. copyright 2006 - id / quake 3 software & designers this map may be used for study but cannot change its design in anyway. this map may also be going in 999gamma 2. but ive not desided yet. i may build my own arena with etf textures and other stuff. 2006 |999|'Kragle' WITH THANKS TO: {JUST-ME} |SMP| BAHA Chruker :::::: EDIT MAP ONLY IF YOU KNOW HOW TO MAKE JUMP PADS WORK :::: q3dm17 waypoints.rar Submitter Lenovo Submitted 03/12/17 Category Maps Map Type Objective Map Size Small Medium Map Theme Undefined Attacking Team Allies Waypoints Yes Known Issues
-
Hi ET people, I have a strange issue. White letters, big on my screen - Connection Interrupted - are constantly there, flickering often very fast. There is no reason for that, and it happen even when I have 20 snaps and the lagometer is perfectly thin green and blue. But I came to the root cause - it is happening only when I set com_maxfps value greater than 125 (which my CPU can handle perfectly fine). So I think it is a matter of tine tuning between several parameters. I will eventually solve this, but to save some time, I wonder if anyone knows how to deal with it. An explanation of the root cause would be also nice.
- 9 replies
-
- 1
-

-
- enemy territory
- et
-
(and 2 more)
Tagged with:
-
File Name: Xmas mods File Submitter: Barn!e File Submitted: 08 Dec 2016 File Category: Mods For DF. Click here to download this file
-
What is the signature about? - Enemy territory The size of the signature in pixels? - don't know, but I guess this forum has some standards, right? The colour combination you prefer? - black and red should dominate (or only those 2 if possible), dragon as a main motive, i like clean and simple design without to much stuff around The text you want on the signature? - i want this two "=F|A= boki" and "Men with courage do not slay dragons, they ride them..." (text without quotes plz!) Anything signature maker should avoid? a lot of colors, quick cheap design, i am not in a hurry :-)
About Us
We are glad you decided to stop by our website and servers. At Fearless Assassins Gaming Community (=F|A=) we strive to bring you the best gaming experience possible. With helpful admins, custom maps and good server regulars your gaming experience should be grand! We love to have fun by playing online games especially W:ET, Call of Duty Series, Counter Strike: Series, Minecraft, Insurgency, DOI, Sandstorm, RUST, Team Fortress Series & Battlefield Series and if you like to do same then join us! Here, you can make worldwide friends while enjoying the game. Anyone from any race and country speaking any language can join our Discord and gaming servers. We have clan members from US, Canada, Europe, Sri Lanka, India, Japan, Australia, Brazil, UK, Austria, Poland, Finland, Turkey, Russia, Germany and many other countries. It doesn't matter how much good you are in the game or how much good English you speak. We believe in making new friends from all over the world. If you want to have fun and want to make new friends join up our gaming servers and our VoIP servers any day and at any time. At =F|A= we are all players first and then admins when someone needs our help or support on server.


