Search the Community
Showing results for tags 'Tutorial'.
Found 9 results
-
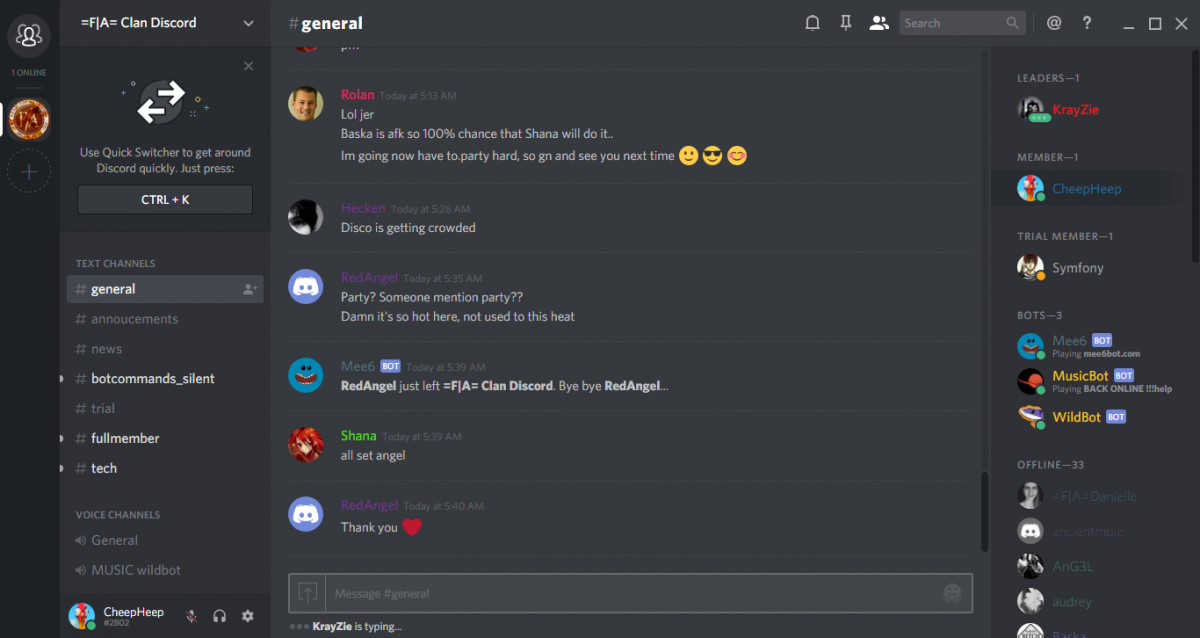
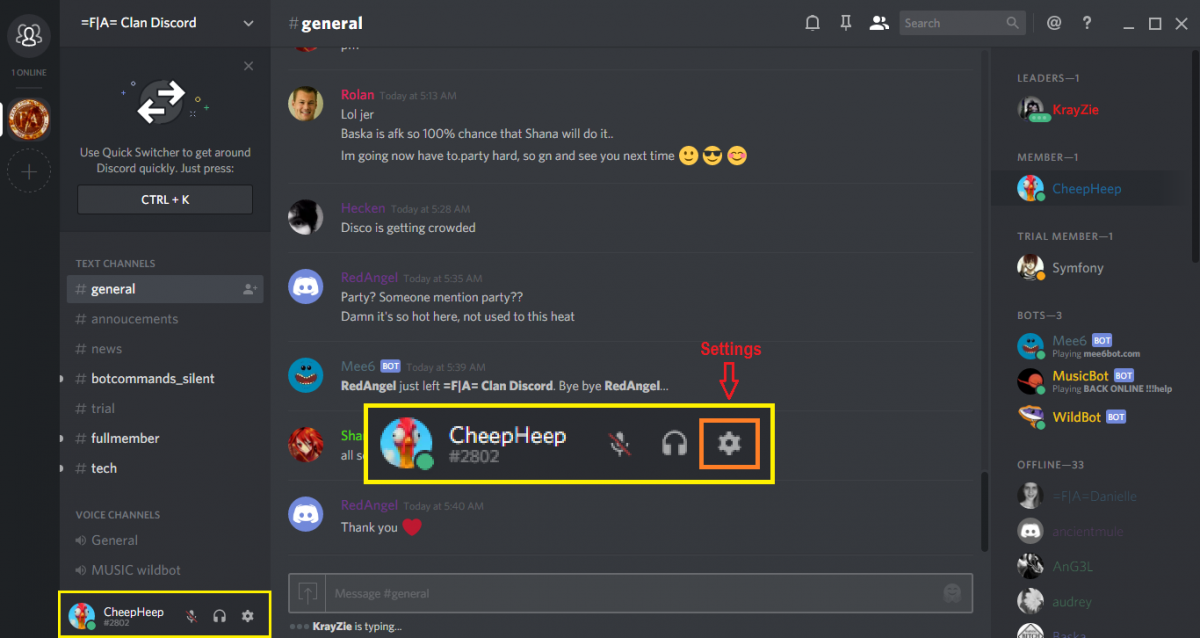
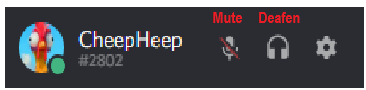
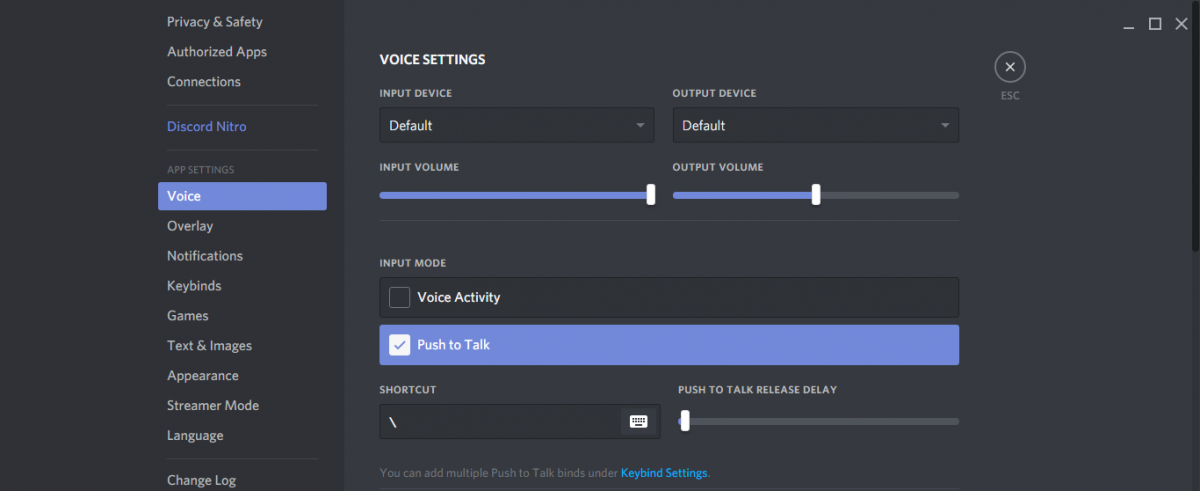
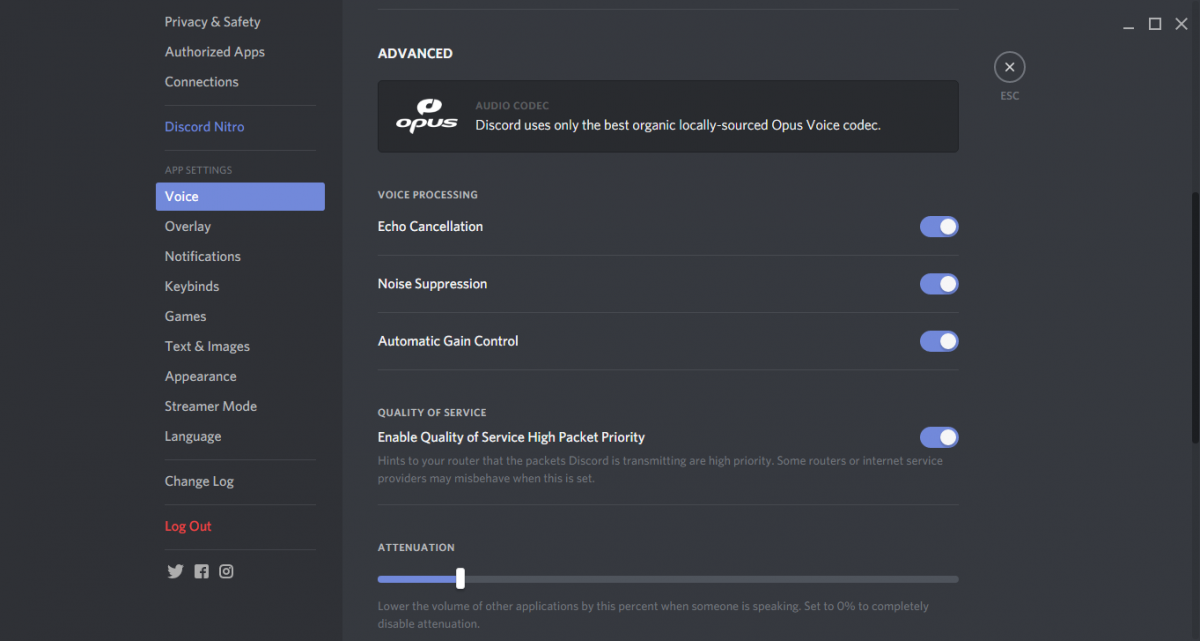
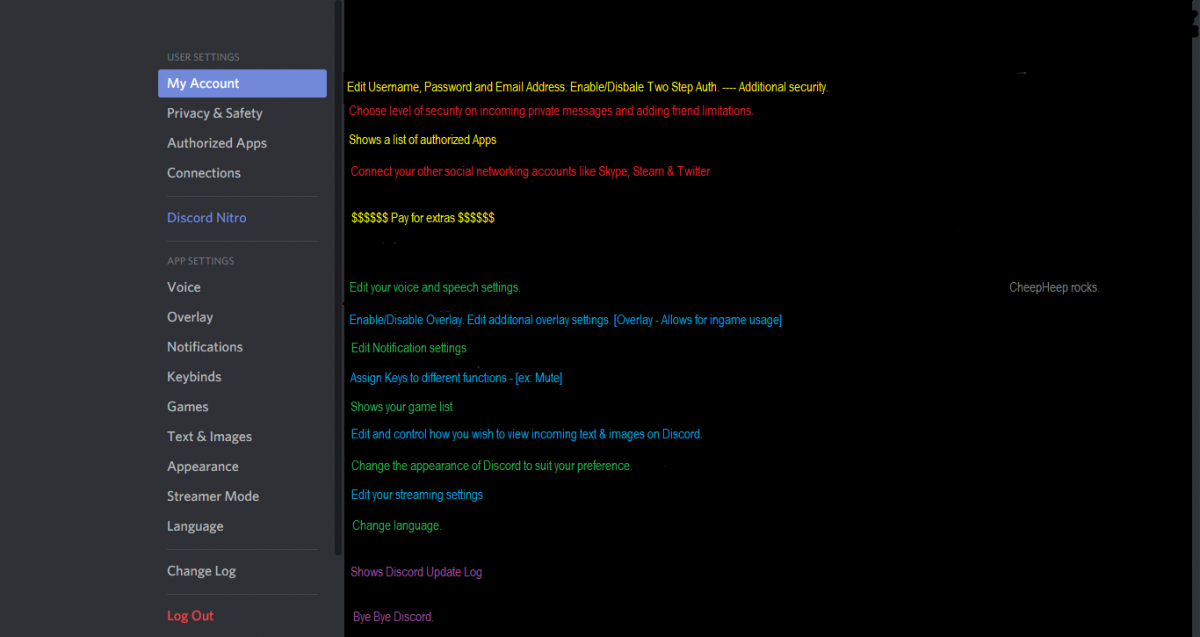
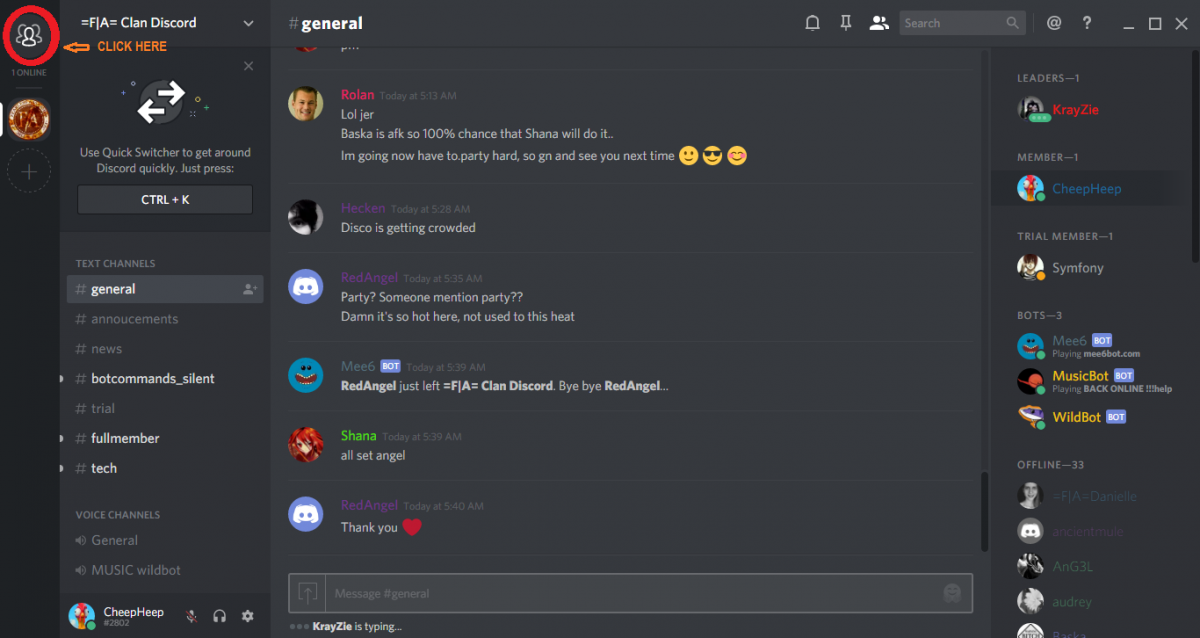
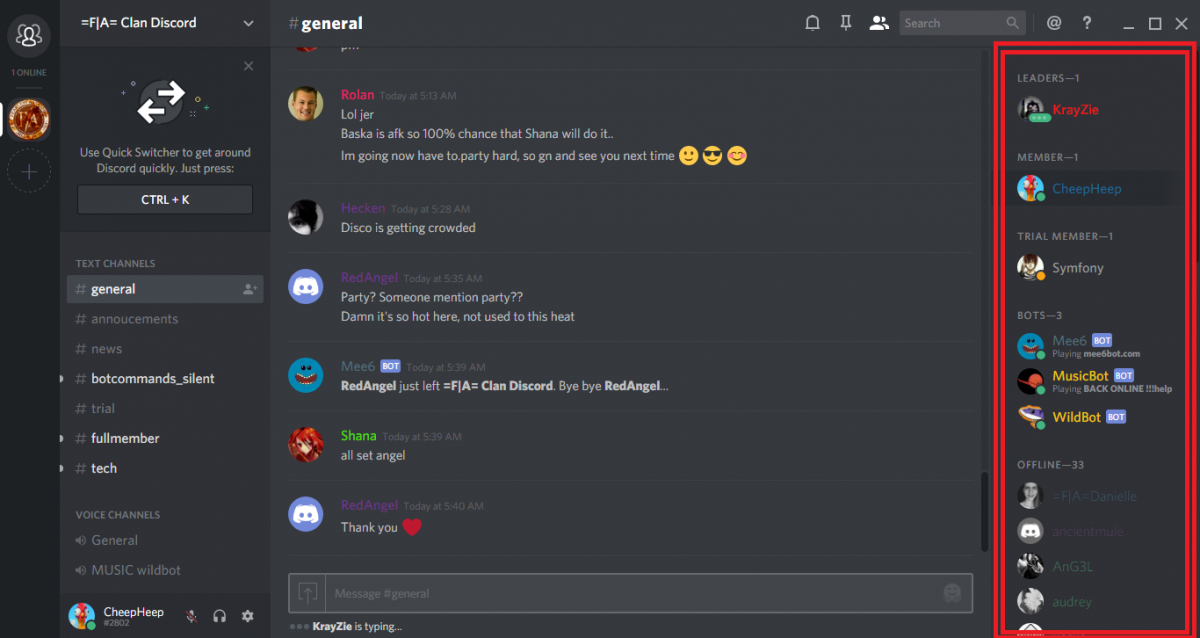
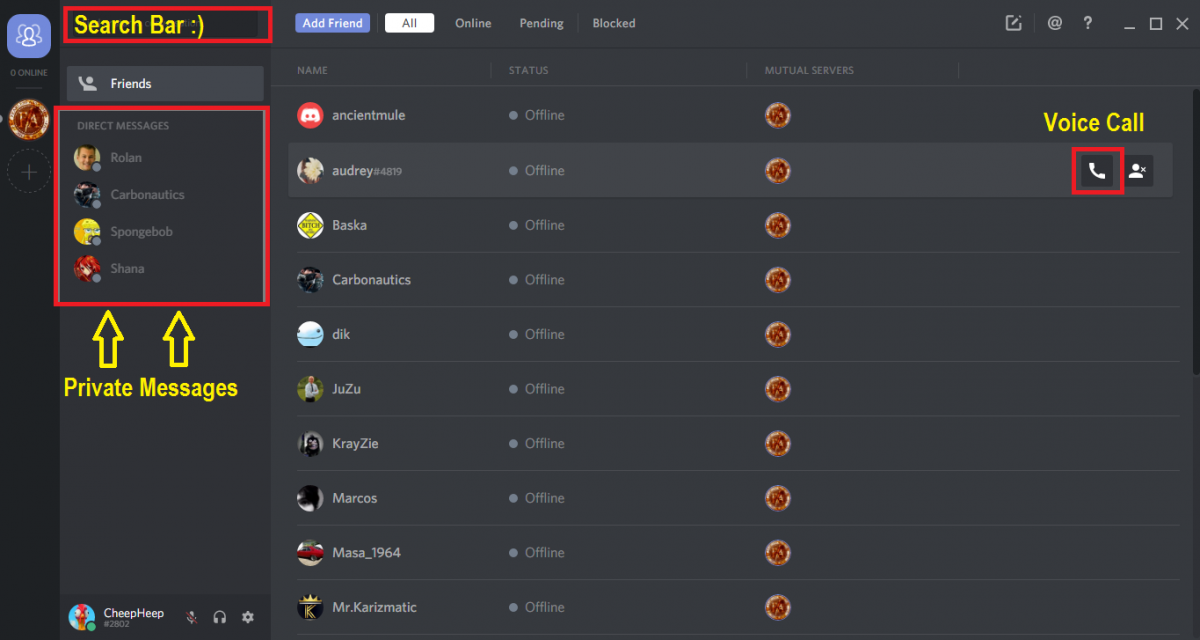
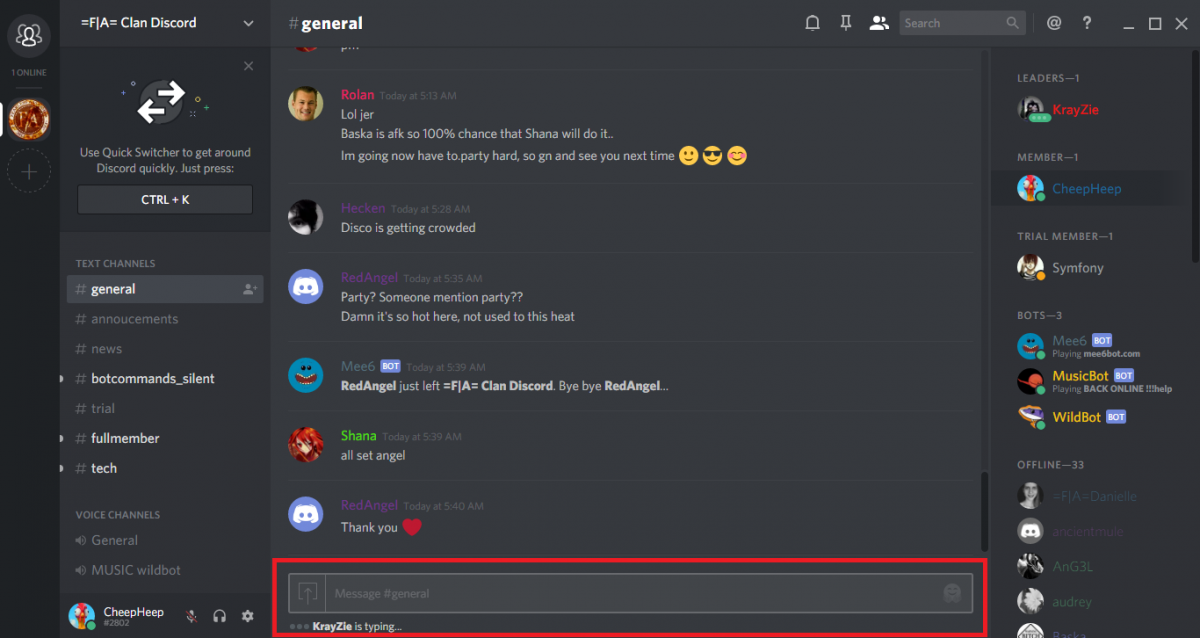
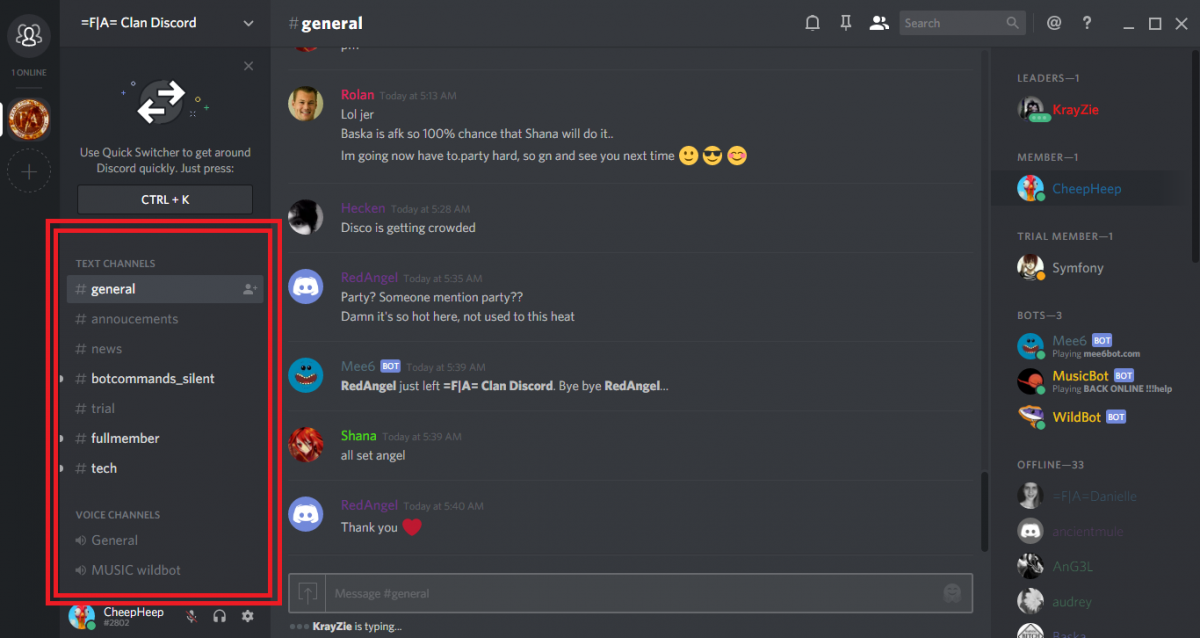
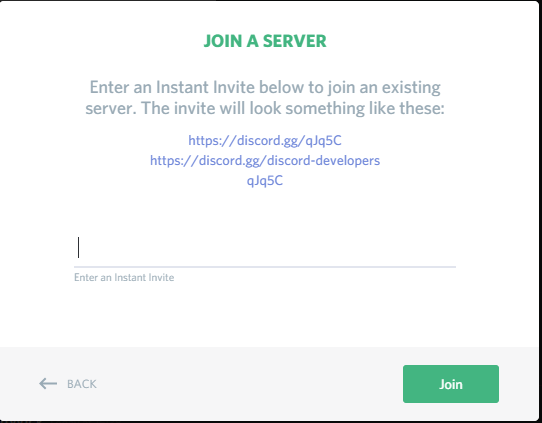
Discord for Dummies Cockadoodledoo! Evidently, the activity on Evolve from our members is essentially non-existent. Therefore, some of our lovely, dedicated members have decided to start up a new VoIP server from Discord to act as a universal platform for swift and easy communication within our community. The benefit with this program is that, if successful, it could potentially nullify the use of both TeamSpeak and Evolve as Discord provides both of the services that TS3/Evolve come with. Thus, making it more organized, compact and practical to use for a gaming clan or a community such as ours as it is much easier to connect with everyone and it all comes in one package. Simple and sweet. Plus it’s FREE! After a few hours of using it, I can positively say that it is incredible. It has many useful features and a wonderful user-interface that is quite easy to adapt to. So I recommend those that don’t have it, get it! ____________________________________________________________________________________________________________________________________ To make it easier for new comers, I have decided to chip in a bit to the upbringing of our Discord server and produce a lovely, simple tutorial introducing Discord and the basic fundamentals that you will need to know to ensure a more comfortable transition. I will also briefly explain the layout of everything, so you don’t get lost on your first visit. Don’t worry, it has pictures! Step 1: Download/Installation To start using Discord, Click Here: https://discordapp.com/ 1. Click on the link provided above. 2. To download a local client, select the Download button (RECOMMENDED) or the adjacent button if you wish to use Discord via your browser. 3. After downloading Discord, simply double click on the Discord_Setup program in your download’s folder and run it. 4. Follow all instructions until installation is complete. Step 2: Creating and Validating Your Account 1. Run Discord 2. To create an account, fill in the empty fields. Like so: Username: ChickenLeader Email Address: AntiKarizmatic-atsign-BOLLOCKS.com Password: ********** 3. To validate and confirm your new subscription to Discord, Go to the email that you used to sign up with. 4. You should have received a confirmation email. Open it and follow the directions provided to validate your account. 5. Done! You are all set! Step 3: Joining a Server Now you should see something similar to this except you will not be connected to a server……yet: To connect to a server, click on the ‘PLUS’ sign button located on the left margin of the application, as shown below: You will see the following: Click on Join a server and enter the link of the server you wish to join. The link serves as an invite so essentially you can only join a server if you are invited. If you have the invite link, you should be able to join without any issues. Done! You should be connected to a server! You can navigate between different servers by simply clicking on the server icon located on the left margin of the program. Here is the invite link for FA’s Discord server: https://discord.gg/GpZzpVg Step 4: User Settings It’s a new program and you want to show off your new pretty profile with a sexy picture. But how? You also want to make sure that your security settings are accustomed to the amount of privacy you are comfortable with. Easy! You also want to start talking with each other and show everyone what a hottie accent you have! So you need to set up your mic and adjust some options to suit your liking. Click on the cog symbol near the bottom of the window, as shown: You will come to a window that looks like this: Refer to the image above for a brief explanation about each setting available for adjustment. Voice & Speech Set-up Click on ‘Voice’ to access the speech options. You should see the following. First you will need to decide whether you want to assign a key to activate your microphone or for your microphone to automatically be active when stimulated by a sound. The safest choice is using “Push-to-talk” as you have more control over what is said over the channel. If you wish to choose “Voice Activity” try and ensure you are by yourself in a quiet environment so you don’t have constant noise being transmitted through your mic disrupting everyone else in the channel anddd you don’t want your mum bursting into your room telling to wash your knickers. Embarrassssssinnggggg. It all looks pretty similar to how you set-up your microphone on TeamSpeak3 but Discord has a few additional features that you can fiddle with as shown below: Tweak the settings to your liking to ensure you and your community members have the best experience possible. To mute and deafen your mic and headphones. You can click on the two icons next the settings button “cog” as shown: Step 5: Introducing Voice & Text Channels Now that you have set-up your microphone, you are ready to spam! Be it with your voice or via text. The choice is yours. A unique feature that Discord provides is that the Text and Voice Channels are independent of each other which is very useful. In many cases, you are playing a game with your teammates and you don’t want to leave the voice channel you are in because you might miss vital information and it can mess up your team coordination buttttt you also need to inform everyone, in and out of the channel, of a certain time sensitive issue. Thanks to Discord you can do this! You can remain in your voice channel; connected and still post a comment of whatever to your target audience by going to the relevant text channel. Easy Peazyyyyy Lemon Squeezy! The Text and Voice channels are located on the left side of the application as shown below. You can change channels by simply clicking on the channel you wish to switch to go to. -Some Voice channels will require special permissions to access and are usually created for the purpose of discussing private content with a specific group of people. -Some Text channels will not allow you to comment in but you will be able to view the content of that channel. This is mainly for announcements etc. Step 6: Interaction & Communication Talking/Typing Now you know where the Voice and Text Channels are, you need to know whether your teammates or friends can hear you. Discord has made it easy to indicate that you are streaming sound from your side by highlighting your name and avatar. A distinct colour will outline your avatar (Green in my case) and your name will change colour. This shows that you’re mic is active. See Image(s) Below: -----------> Now on to typing. To type and post a comment, simply click on the text box near the bottom of the application as shown below: You can add emoticons to further express your feelings and abhorrent emotions towards other members. You can also use it to activate certain features using special commands. A lot of fun stuff to be learned! Just go and experiment! Online/Offline list To see who is online on the server you are connected to, simply look to the right of your application. On the right column it will show the list of Online AND Offline members for that server. Certain settings allow for the segregation of online members into their different role groups. This enables us to locate different members with different roles and permissions more easily. This can be seen below: Private Messaging & Other Interactions To interact with a specific person. Right-click on their name. A drop-down menu should appear as shown below: Here you can choose to do a number of things. You can alter the output volume for this particular person. If he’s talking too loudly, you can lower it and vice versa. You can voice call, send a private message and access their profile page among other things. An alternative method to send a private message or voice call a friend or a member of the server is by first clicking the icon located in the top left corner labelled “Direct Messages”. See Below: After clicking on it, you will see a list of your friends with your open Private Messages on the column to the left. To start a new private message with another member. Simply type their username in the search bar located at the top of the left column. Simple. To start a voice call, hover your cursor over the name of the friend you wish to contact. Two icons will appear at the end, one being “start voice call”. Click the phone icon to start the voice call. As shown below: Tip: For quick Navigation, press Ctrl + K. A window should pop up with a search bar allowing you to quickly type the channel you wish to go to or a member you wish to find. ____________________________________________________________________________________________________________________________________ So as of now, you should know how to join a server. You should know how to talk via text and speech. You should know how to PM/Voice call someone. You should be a little more familiar with the layout and interface of Discord. Basically you should know enough to get you through the first few days without getting lost. There are a tonne of other features and cool gizmos to learn and experiment with which will take a little more time to familiarize yourself with. Once I’m more up to date with how Discord works and runs. I will make another tutorial on all the extra bits and bobs! Keep a look out! GET IT NOW! If you have any questions, you can ask it in the support topic of this tutorial. I will try and reply to them asap! Thanks for reading! _____________________________________________________________________________________________________________________________________ ************************************************************************************************************************************************************* For extra information on specific areas of Discord, see below for links to additional tutorials created by some of our fabulous members! (Credit to the Creators) Karizmatic Game Detection - If a game of yours doesn't register on Discord. Don't fret, follow this guide to manually add this game. We want everyone to see your favourites! Discord Overlay - Having problems with Discord's Overlay feature? Take a peek at this detailed yet easy-to-follow tutorial!

-
Before I begin to post the Forms, I would like to say something. I decided to build this for many reasons, but none more than these. I wanted to honor all the greats and the friends that I have had the privilege of playing with for many years and hopefully for many years to come. I am not saying these guys are the best of the best, but instead, I am saying that they are of the higher echelon and anyone who has played this game for a long time knows them, and has most likely watched them over the years as I have and learned a tremendous amount from them. Any of the mentioned players in these forms I suggest watching to help pick up the forms and see how some of these tactics are done and can be modified. I was always taught in my old clan that spectating is truly needed and essential to improve and advance to greater levels of playing this game and of course others, along with study and planning, always have a plan. I also wanted to make something for anyone who just starting in ET to use and have to help acclimate and adapt to ET which can be very very hard. Much of what I bring is from the old days and from that clan, but also as said before from the greats and what we learned from them then and what I have learned from them now. Paying homage to those who have been in the same virtual world as I for all this time of great fun, challenge, adversity, talkin shat banter, incredible happenings. I mean some of you are closer to my life than anyone in it in ways. I can't thank you all enough for that. And now for the homage C!t0 Bows
- 23 replies
-
- 10
-

-

-
These are basic introduction videos to the game from the Developer team. May be of some help to people completely new. (This covers both Multiplayer and Cooperative)
-
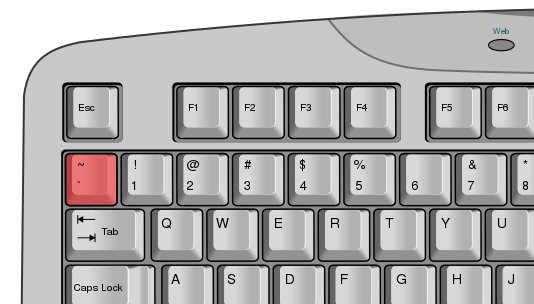
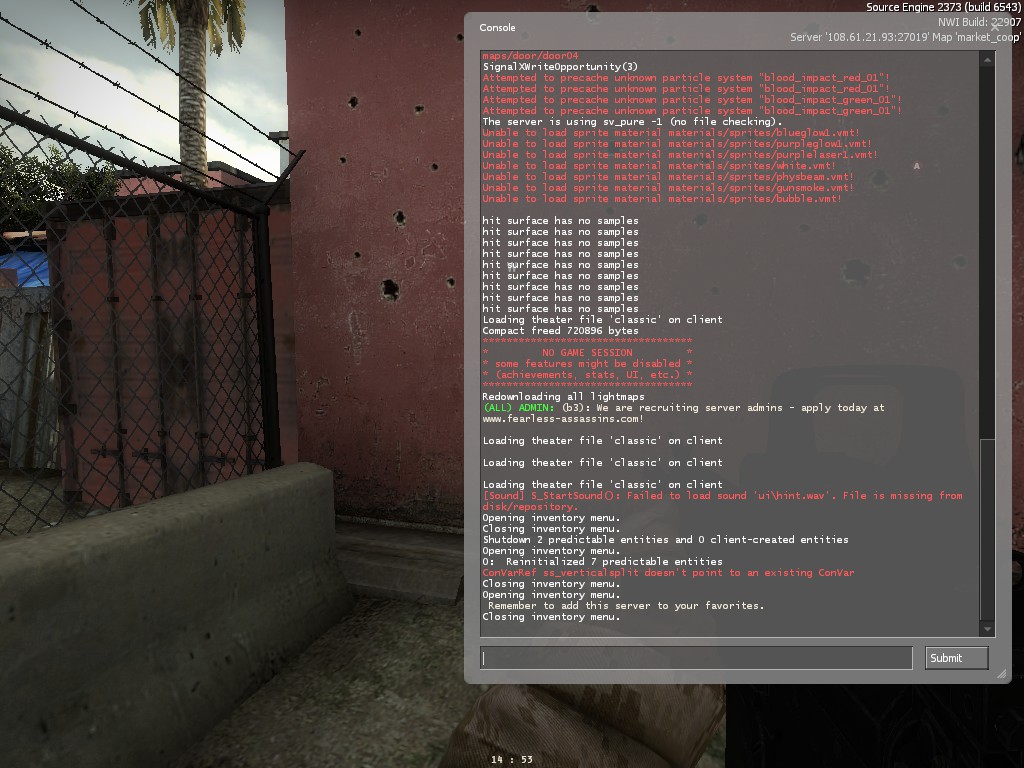
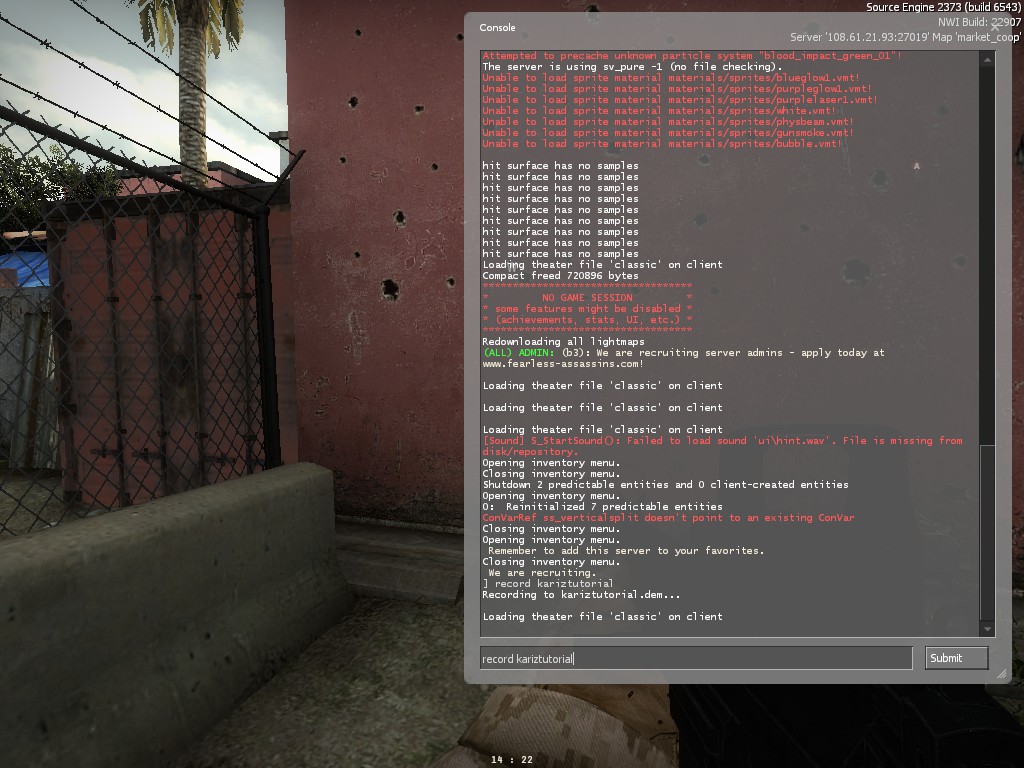
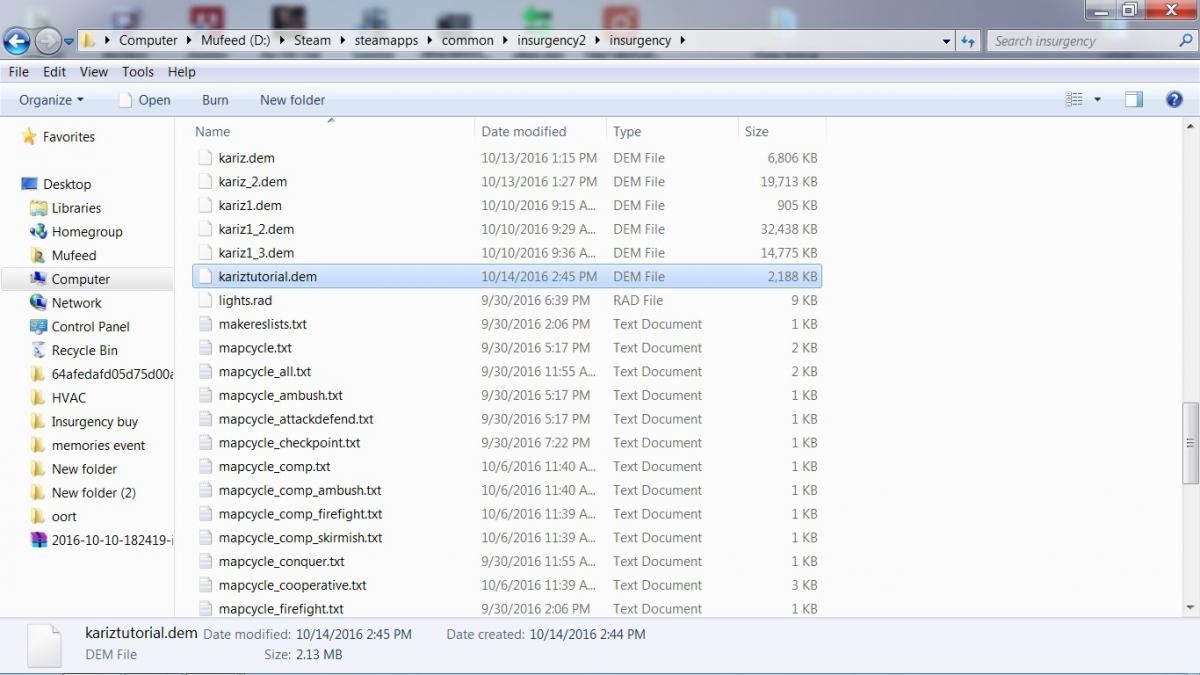
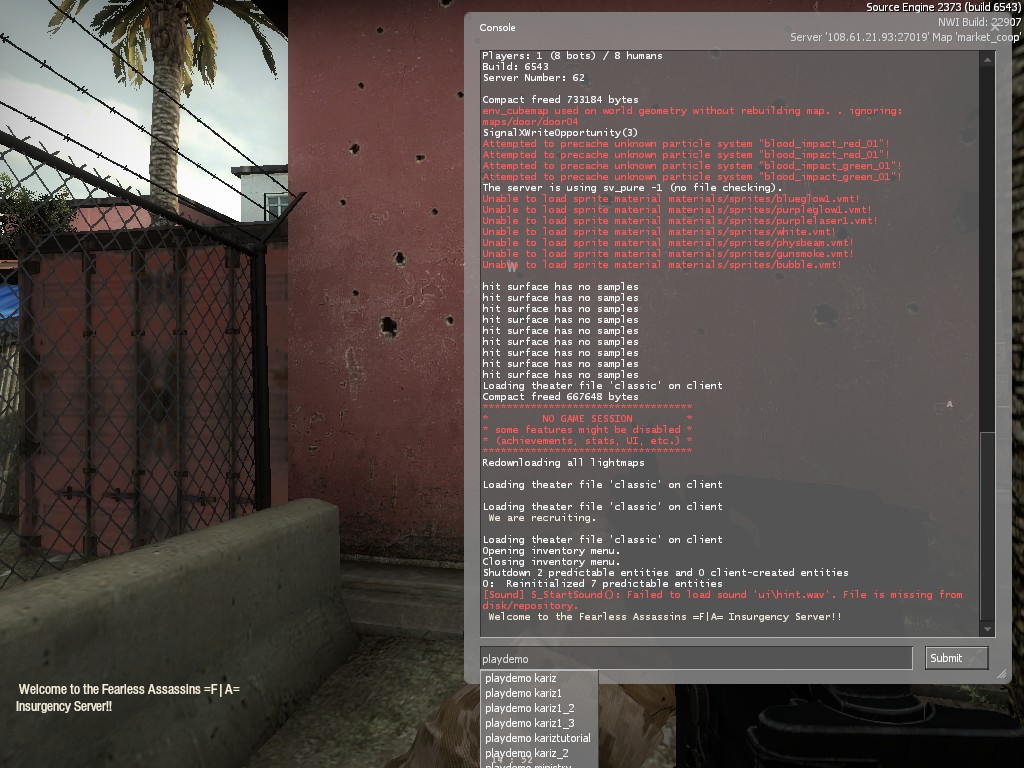
1. Start the game from steam. 2. Join any F|A server.. 3. When you are in any one of the servers mention above. Press console button ~ . . 4. It will show you this ------> 5. Type record <Name of the File u want it to be > ( Ex: Record karizmatictutorial) 6. Then once it records then when u want to stop the demo open the console again by pressing ~ and write stopdemo. 7. Then go to \steam\steamapps\common\Insurgency2\Insurgency and u shall see the name of the file u saved ( for mine i saved it with karizmatictutorial) so i shall find karizmatictutorial. Like this ---> ( NOTE: This is my Steam directory- I moved it from "C:\Program Files (x86)" Most of you may find it there..) 8. If your want to play it back on Insurgency server do this ---> 9.. Thats how u record demo in insurgency and once u record it and want to post on forums . Unzip it and attack it on forums there is option on forums. Good luck enjoy if u have any question feel free to ask...
-
post here explicative videos or guides about car mechanics please, for example how to repair an engine, how works a radiator, how to improve your car suspention and so on. it would be good to have a trend where we can share useful and practical knowledge.
-
As far as i remember, last month/weeks ago ive posted a help about creating Spawnpoints and stuff but i guess nobody sorted out( http://fearless-assassins.com/topic/73486-adding-spawnpoints-help/), but after research and thinking, testing/scripting alot ive managed to find a way for creating spawnpoints for map & and i will show you guys how ive did it. Therefore, There are some maps that actually doesnt have Spawnpoints, How are we going to create or add one? , Easy..Just have a look on the video. https://www.youtube.com/watch?v=qdrpx_ttlyY In Theory:- 1)Download or find a map that doesnt have spawnpoints 2)Open its .pk3 file and inside you will find the "map" folder 3)Open the "map" folder you will find the (mapname).script file. 4)Open the (mapname).script file with notepad and u will see something likes this (The .script file inside the map shows you how the map is controlled or i can say how the map is working and how is it making it run according to the objectives and the teams itself) game_manager { spawn { wm_axis_respawntime 3 wm_allied_respawntime 3 wm_set_round_timelimit 30 wm_set_defending_team 0 wm_setwinner 1 setautospawn "Allies Spawn" 1 setautospawn "Axis Spawn" 1 wait 1000 } } -Sometimes some maps with more objectives and stuff have more codes..like this one. game_manager { spawn { wm_axis_respawntime 5 wm_allied_respawntime 5 wm_set_round_timelimit 25 // Stopwatch mode defending team (0=Axis, 1=Allies) wm_set_defending_team 0 // Winner on clock 0:00 (0=Axis, 1=Allies, -1=Nobody) wm_setwinner 0 wait 100 setstate sroom_1 default setstate sroom_2 invisible setstate sroom_3 invisible setstate sroom_4 invisible setstate sroom_s1 default setstate sroom_s2 invisible setstate sroom_s3 invisible setstate sroom_s4 invisible setstate sroom_teleport invisible } } opener1 { trigger { trigger door1 open } } opener2 { trigger { trigger door2 open } } closer1 { trigger { trigger door1 close } } closer2 { trigger { trigger door2 close } } door1 { spawn { accum 0 set 0 // whether the door is open or closed } trigger open { accum 0 abort_if_equal 1 stopsound playsound sound/movers/doors/door2_open.wav gotomarker door1_down 640 accum 0 set 1 } trigger close { accum 0 abort_if_equal 0 stopsound gotomarker door1_up 480 accum 0 set 0 } } door2 { spawn { accum 0 set 0 // whether the door is open or closed } trigger open { accum 0 abort_if_equal 1 stopsound playsound sound/movers/doors/door2_open.wav gotomarker door2_down 640 accum 0 set 1 } trigger close { accum 0 abort_if_equal 0 stopsound gotomarker door2_up 480 accum 0 set 0 } } sroom_1 { trigger { setstate sroom_1 invisible setstate sroom_2 default setstate sroom_s1 invisible setstate sroom_s2 default } } sroom_2 { trigger { setstate sroom_2 invisible setstate sroom_3 default setstate sroom_s2 invisible setstate sroom_s3 default } } sroom_3 { trigger { setstate sroom_3 invisible setstate sroom_4 default setstate sroom_s3 invisible setstate sroom_s4 default } } sroom_4 { trigger { setstate sroom_4 invisible setstate sroom_s4 invisible setstate sroom_teleport default } } sroom_reset { trigger { setstate sroom_1 default setstate sroom_2 invisible setstate sroom_3 invisible setstate sroom_4 invisible setstate sroom_s1 default setstate sroom_s2 invisible setstate sroom_s3 invisible setstate sroom_s4 invisible setstate sroom_teleport invisible setstate sroom_timer invisible } } ----------------------------------------------------------------- 5)Somehow if you want to add a spawnpoint, You Should make sure you start adding it after the "Spawn{" Code Like this.. game_manager { spawn { create { scriptName "allies_obj" classname "team_WOLF_objective" targetname "alliesspawn_obj" origin "-10853 -2036 6" spawnflags 2 } 6) This is the Main(Starting Code Spawnpoint) For Allies, You must Put this Code at first if you want to start creating a spawnpoint for Allies Team. create { scriptName "allies_obj" classname "team_WOLF_objective" targetname "alliesspawn_obj" origin "-10853 -2036 6" spawnflags 2 } 7)After adding the first code for creating spawnpoint for allies, You want to lets say add amount of 5 spawnpoints for allies, so u will put it in this way.. create { scriptName "allies_spawn1" classname "team_CTF_bluespawn" targetname "allies_spawn" origin "-4288 384 72" spawnflags 2 angle "0" } create { scriptName "allies_spawn2" classname "team_CTF_bluespawn" targetname "allies_spawn" origin "-4288 468 72" spawnflags 2 angle "0" } create { scriptName "allies_spawn3" classname "team_CTF_bluespawn" targetname "allies_spawn" origin "-4287 281 72" spawnflags 2 angle "0" } create { scriptName "allies_spawn4" classname "team_CTF_bluespawn" targetname "allies_spawn" origin "-4381 281 72" spawnflags 2 angle "0" } create { scriptName "allies_spawn5" classname "team_CTF_bluespawn" targetname "allies_spawn" origin "-4381 380 72" spawnflags 2 angle "0" } So All Together for an allies spawnpoint will look like this game_manager { spawn { create { scriptName "alliesspawn_obj" classname "team_WOLF_objective" targetname "alliesspawn_obj" origin "-4288 384 72" spawnflags 2 description "Allies Spawn" } create { scriptName "allies_spawn1" classname "team_CTF_bluespawn" targetname "allies_spawn" origin "-4288 384 72" spawnflags 2 angle "0" } create { scriptName "allies_spawn2" classname "team_CTF_bluespawn" targetname "allies_spawn" origin "-4288 468 72" spawnflags 2 angle "0" } create { scriptName "allies_spawn3" classname "team_CTF_bluespawn" targetname "allies_spawn" origin "-4287 281 72" spawnflags 2 angle "0" } create { scriptName "allies_spawn4" classname "team_CTF_bluespawn" targetname "allies_spawn" origin "-4381 281 72" spawnflags 2 angle "0" } create { scriptName "allies_spawn5" classname "team_CTF_bluespawn" targetname "allies_spawn" origin "-4381 380 72" spawnflags 2 angle "0" } 8)Same For Axis But there will be just difference in their script words like the scriptname,classname and the targetname. create { scriptName "axisspawn_obj" classname "team_WOLF_objective" targetname "axisspawn_obj" origin "-1408 384 72" spawnflags 2 } create { scriptName "axis_spawn1" classname "team_CTF_redspawn" targetname "axis_spawn" origin "-1408 384 72" spawnflags 2 angle "-179" } create { scriptName "axis_spawn2" classname "team_CTF_redspawn" targetname "axis_spawn" origin "-1407 298 72" spawnflags 2 angle "179" } create { scriptName "axis_spawn3" classname "team_CTF_redspawn" targetname "axis_spawn" origin "-1407 479 72" spawnflags 2 angle "179" } create { scriptName "axis_spawn4" classname "team_CTF_redspawn" targetname "axis_spawn" origin "-1322 383 72" spawnflags 2 angle "179" } create { scriptName "axis_spawn5" classname "team_CTF_redspawn" targetname "axis_spawn" origin "-1322 303 72" spawnflags 2 angle "179" } 9)So All Together Axis & Allies Spawnpoints together should look like this :- game_manager { spawn { create { scriptName "alliesspawn_obj" classname "team_WOLF_objective" targetname "alliesspawn_obj" origin "-4288 384 72" spawnflags 2 description "Allies Spawn" } create { scriptName "allies_spawn1" classname "team_CTF_bluespawn" targetname "allies_spawn" origin "-4288 384 72" spawnflags 2 angle "0" } create { scriptName "allies_spawn2" classname "team_CTF_bluespawn" targetname "allies_spawn" origin "-4288 468 72" spawnflags 2 angle "0" } create { scriptName "allies_spawn3" classname "team_CTF_bluespawn" targetname "allies_spawn" origin "-4287 281 72" spawnflags 2 angle "0" } create { scriptName "allies_spawn4" classname "team_CTF_bluespawn" targetname "allies_spawn" origin "-4381 281 72" spawnflags 2 angle "0" } create { scriptName "allies_spawn5" classname "team_CTF_bluespawn" targetname "allies_spawn" origin "-4381 380 72" spawnflags 2 angle "0" } create { scriptName "axisspawn_obj" classname "team_WOLF_objective" targetname "axisspawn_obj" origin "-1408 384 72" spawnflags 2 } create { scriptName "axis_spawn1" classname "team_CTF_redspawn" targetname "axis_spawn" origin "-1408 384 72" spawnflags 2 angle "-179" } create { scriptName "axis_spawn2" classname "team_CTF_redspawn" targetname "axis_spawn" origin "-1407 298 72" spawnflags 2 angle "179" } create { scriptName "axis_spawn3" classname "team_CTF_redspawn" targetname "axis_spawn" origin "-1407 479 72" spawnflags 2 angle "179" } create { scriptName "axis_spawn4" classname "team_CTF_redspawn" targetname "axis_spawn" origin "-1322 383 72" spawnflags 2 angle "179" } create { scriptName "axis_spawn5" classname "team_CTF_redspawn" targetname "axis_spawn" origin "-1322 303 72" spawnflags 2 angle "179" } 10) And now Lets add this code in the map's ".script" (MAPS THAT DOESNT HAVE SPAWNPOINTS) *It Should look like this after all, Both Allies and Axis have 5 Spawnpoints now* http://pastebin.com/i8QzU530 *Important Notices* ~ The Map Should be without spawnpoints if u want to add one, if you are adding a spawnpoint on a map that has already one , then it might not work at all ~ ~ Spawnflags means = 2(ALLIES) 1(AXIS), sometimes Most of the map's axis spawnpoint doesnt work if u add number 1 in the axis's spawnflag code so better for both teams add "spawnflag 2" in the spawnpoint codes ~ ~ Sometimes Map will crash..the problem is that you have done some typo or missed some brackets in the .script , so becarefull and put the code properly as how i did ~ ~If you want to increase the amount of spawnpoints, then continue the same code by adding a allies_spawn2..3..4.5..6 etc. ~It will not work if you test it with your Local Host, You should create a private jaymod server and test it there, or share it with your freind's private server.
-
- 1
-
-
- tutorial
- mapscripting
- (and 3 more)
-
Hi, i was just wondering whether to make ET tutorial section more clear and user-friendly, so here are proposed subcategories: -Basic tutorials: -Etkey/Guid tutorials: -Problem related tutorials: -Config/scripts/binding tutorials: -Installation tutorials: -Tweaks tutorials: -Connecting tutorials: -Voice/Sound tutorials: -Specific tutorials: -Demos related tutorials I know we got search box:p and i know that it would be time-consuming but if you just like it i can do that easily In spoiler i attach all links from ET tutorials sections already assigned to proper subcategory.
-
Submitted SteamID is required for everybody in order to get an admin level on our server (so if you are a server regular who wants to be lvl 4 admin or you just applied for membership, your SteamID must be submitted). This tutorial will show you how to submit it correctly. Start a game and enter a server (you can type connect 108.61.21.92:27015 in console) Open a console by pressing ~ (if console doesn't appear after pressing the key, use this tutorial: Click Once console is opened, type Status and press Enter. Select your SteamID and click copy, then paste it here: UserCP Once it's done, click 'Save Changes'. This is an example of a SteamID: STEAM_1:1:54794467 IMP NOTE: Make sure you don't miss any character or put a wrong ID into your profile.
-

How to write topics / posts when asking for help or submitting tutorials
daredevil posted a blog entry in Tech Blogs
1. Topic title: It should be useful and relate the issue which you are having. Good Example: Ignoring Queries Kick by Punkbuster Laptop FPS issue for Enemy Territory Lag problem for Enemy Territory Bad examples of above topics: Help – Does help says anything? No. FPS Sucks – Ok we understand you are having low FPS but sucks for what game? Problems!!!! – Ok does it make sense to you? If topic title doesn’t make sense to you, then let me tell you it will not make sense to others also. 2. Tags: Use some tags so when someone clicks on it, they can find related topics. I mean really some people use pretty much very bad topic tags. By tagging you are saying your topic relates to this and this subject. Example: http://fearless-assa...illed-in-sirte/ Notice the tags? “dj-news” You ask yourself who in the world is going to search based on dj-news ? People are going to search based on Gadhafi, killed, etc. Right tag would be gadhafi, killed, leader, dead, libyan and if you want in the end add dj-news. Now when user click on that tag gadhafi, they can find all posts related to it on forum. Same goes for FPS, Enemy Territory, COD, etc help related topics. Use valid tags and help others at the same time. By choosing right tags you are not helping yourself but also helping someone who might be having same issue in future. 3. Google +1. In each download or tutorials links, we have added Google +1. If you like something nice rather then saying +1 or nice one, click on Google +1 icon. This way rather then having 50 "nice" post, you can easily see 50 users liked this tutorial. PS Keep up the Good work with news reporting. At least now I/we have something worth reading rather then useless spam in spam section. Special thanks to those who are reporting news, submitting tutorials and maps, software, etc in our download section. Thanks!- 4 comments
-
- 8
-
-
- submission
- tutorial
- (and 1 more)