Search the Community
Showing results for tags 'ubuntu'.
Found 11 results
-
 Normally, if you want to run ET natively on linux, choose a 32 bit distro and follow the excellent tutorial already posted. In my case however, I had a computer with 16 Gb of ram, and so that wasn't an option. On to the steps. 1. Back up. You have a couple of options; backup the entire ET folder to a jump drive or external hd, or just back up the following files: etkey (you should already have this backed up) autoexec.cfg (if you use one) silent.dat (if you play on that mod. This file stores your xp AND level on silent servers) 2. Install your distro. (I used 64 bit Linux Mint 13, cinnamon) 3. Write the following in the terminal: sudo apt-get install ia32-libs (This installs 32 bit emulation support) ***If this generates an error message, jump down to the end for a probable solution*** 4. Download et-linux-2.60.x86.run from the interwebs 5. Type the following into console: cd /Downloads*if you didn't download into that folder, substitute the correct path* sudo chmod +x et-linux-2.60.x86.run*allows you to execute the file* sudo linux32 ./et-linux-2.60.x86.run*runs the install in 32 bit emulation, as root* You should now be led through the steps by the installer. *Important* Even though PB is no longer supported, make sure you install it!! Otherwise your backed up etkey is useless. When asked if you want to run it now, decline (not a good idea to run as root, there are some security issues) 6. Now copy your backed up files to etmain located at /home/(username)/.etwolf You will have to hit ctrl+h to show the hidden files in your home directory. 7. Try running ET by typing the following into the console: linux32 et*without the linux32 part, very odd and unpleasant things happen* 8. To fix the sound, I did this: 1. I have downloaded this script: http://nullkey.ath.cx/~stuff/et-sd [...] -sound.gz. (Alternative mirror: http://members.lycos.co.uk/lordban [...] l-sound.gz )2. The script was not working from scratch. I have had to edit it manually. First locate where your Wolfenstein installation directory is (via locating et.x86 file. The dir/folder where the file is, is your installation dir. In my case it was /usr/local/games/enemy-territory )3. Now open downloaded script wolfsp-sdl-sound file with text editor (on my Mandriva I just used KWrite, but for other distro just use default one)4. At the beginning of the file you will find disabled grey text/comment. There will be such a text (search for it): "# You can set this in GAME_PATH environment variable" and just underneath the text there will be the variable called GAME_PATH="".5. Remove the hash (#) from before the GAME_PATH variable. The text may become colorful as it is no longer disabled comment.6. Now type in your full path to Wolfenstein installation dir between inverted comas. In my case it looked like this: GAME_PATH="/usr/local/games/enemy-territory". It is like this by defauld, so you may just use it, if you haven't change installation dir.7. Now go down the file, and locate another variables which are GAME_BIN and GAME_DIR.8. Change value of GAME_BIN to GAME_BIN='et.x86'9. Change value of GAME_DIR to your Wolfenstein installation dir only (not a path!). In my case it was: GAME_DIR='enemy-territory'. It's default folder (directory/catalog whatever you call it...) so if you haven't change it during installation, use that one.10. That's it!11. Now drag and drop your edited "wolfsp-sdl-sound" file into the console window and execute it by pressing ENTER. Voila! The Wolfenstein is running with SOUND now!12. [applause] [color=#000000][font=Ubuntu]I did have to write "linux32" without quotes before dragging and dropping the script into the terminal (linux32 '/home/Downloads/wolfsp-sdl-sound')[/font][/color] You can now create a shell script that will do handle launching ET without writing a whole bunch of crap in the console. create a file called ET in your home folder, and write the following inside it: #!/bin/bashclearlinux32 /home/[insert username here]/Downloads/wolfsp-sdl-soundNow in console type sudo chmod 777 ETNow, in order to play et, open the console and type ./ETThis will launch the game with sound enabled. **newly added** I was experiencing a delay in the sound of about half a second, which was very annoying. Found the following fix online: Create a new file /home/yourusername/.pulse/client.conf with one single line: Code: autospawn = no Kill PulseAudio with the command pulseaudio -k Try it if you have the same issue. Yes this is a giant chore, but as long as it works http://fearless-assa...O_DIR#/wink.png Any questions or problems, feel free to hit me up on xfire (you will need to install gfire plugin for pidgin to use xfire on linux) Added 4-16-2013 For later versions of Linux like Debian Wheezy, an alternate method may be required. If you get error messages when you try to install ia32-libs, follow these steps: In terminal, with root permissions dpkg --add-architecture i386 apt-get update apt-get install ia32-libs wget -q -O - http://nullkey.kapsi.fi/et-sdl-sound/et-sdl-sound.gz | gzip -d > et-sdl-sound && chmod a+x et-sdl-sound This should take care of everything at one fell swoop. Run et-sdl-sound to start ET.
 -
Installing Ubuntu This section will show you how to download and install Ubuntu and give you a brief introduction to that popular Operating System. This tutorial deals with Ubuntu 10.04 Lucid Lynx but will most likely work with every following version as well. It will guide you through the intuitive installation using an ordinary USB flash disk with at least 1GB of disk space. There's also a way to install it without using a CD/DVD or a USB flash disk, but this way you'll produce a universal Linux flash disk which could be used to install Ubuntu on any PC or as Recovery-CD to retrieve data from a broken system. Downloading Ubuntu The first thing you obviously need to do to install Ubuntu on your system is downloading an installation image of it. Therefore, head over to Ubuntu.com and download the 32-bit version of Ubuntu. Hint: The main Ubuntu mirrors are usually pretty busy. Sweden's mirror is currently one of the fastest in Europe. Creating a Ubuntu USB flash drive Attach a regular USB flash drive with at least 1GB of disk space to your PC. Since the data on the flash drive will be erased during that step, I'd recommend backing up your data, using an old flash drive or buy a new one. (They are only about 10$ and you could use it for whatever you want afterwards.) Now open a command line with administrative rights by opening your Start menu, typing in cmd and right click the first entry to Run as administrator. Enter the following commands. (Note that X equals the Disk # from list disk.) Having your bootable flash drive ready, extract the Ubuntu image's content to your flash drive using WinRar or any other program which is able to extract .iso files. Hint: For more detailed instructions on how to create a bootable flash drive, have a look at this tutorial. Image: http://fearless-assa...=images&img=610 Installing Ubuntu Reboot your PC and make sure you selected to boot from a USB flash drive. (The key to select this option is mostly F12 or ESC, please refer to your Mainboard's documentation for further information on this.) As soon as the purple screen with the accessibility icon on the bottom appears, hit the Enter key and select the language of your choice. Navigate to Install Ubuntu to start the installation routine. The first three steps are self-explanatory and will guide you through the basic settings. When it comes to disk space preparation, select Install them side by side, choosing between them each startup and continue. Enter your login credentials, decide whether to import your documents from your Windows partition and start the installation process. This may take a while, depending on your computer's performance. Reboot your PC and remove the USB flash disk when asked to. You will be presented with Linux' bootloader, GRUB. As you might have already expected, you could either boot into your new Ubuntu installation by choosing Ubuntu, with Linux 2.6.32-21-generic (Version number depending on the installed kernel.) or into your old Windows by choosing Windows 7 (loader) (on /dev/sda1). Image: Configuring Ubuntu To prevent any security leaks, we are going to change the password of Ubuntu's Administrator account, called root. To do so, open a new Terminal window by navigating to Applications – Accessories – Terminal. Type in sudo passwd, enter your user's password, enter a new password for root and confirm it. I recommend updating the system regularly, which could be either done graphically or via Terminal. Since I prefer the latter way, run the following command to update the application list, update the applications themselves and upgrade the system's core, called kernel: To install drivers needed to run Enemy Territory smoothly, go to System – Administration – Hardware Drivers, let it update it's lists and follow the on-screen instructions to installed the drivers. Installing Enemy Territory This section will show you how to download and install the game itself, updating PunkBuster, fixing potential sound problems and finally how to uninstall it. Note: To install Enemy Territory on a 64-bit system, you need to have ia32-libs installed. Feel free to contact me for further details. Downloading and Installing Enemy Territory The Linux version of Enemy Territory consists of the the game in version 2.60 of about 260MB and a linux update of about 8MB. To download both from a fast mirror, run the following commands in Ubuntu's Terminal application: Following the usual process, we install the game first by running sudo sh et-linux-2.60.x86.run. If you didn't run into any problems yet, you will be prompted with a semi-graphical installation routine. Accept the license agreements, leave the installation path at it's default value /usr/local/games/enemy-territory, the symlink path at /usr/local/bin and leave both options, Enemy Territory and PunkBuster client/server files, checked to make sure it installs PunkBuster as well. Accept PunkBuster's license agreement and install the startup menu entries. To prevent security problems, please do not start the game from the installer's prompt because it will run it as root, being able to make changes on your system without notifying you. Repeat the same procedure to install the patch: Execute it with sudo sh et-linux-2.60-update.x86.run, accept the license agreements, leave the paths on their default values and you're done. Hint: To clean up the Terminal window, just type in clear and hit the Enter key. Image: Updating PunkBuster It's time to get an up-to-date version of PunkBuster to avoid getting banned from your favorite servers. To download the updates, visit PunkBuster's pbsetup.run website, pass the Captcha and download the file. Since the file will be downloaded to your user account's Downloads folder, move it to the desktop for your comfort. You could easily access the Downloads folder by navigating to Places – Downloads. Extract the ZIP-File by right clicking on it and selecting Extract Here. Run the following commands from your Terminal window to update PunkBuster: Image: Fixing Downloads and Sound Run the game once to create the required folder structure by navigating to Applications - Other - enemy-territory. Execute sudo chown -R fa:fa ~/.etwolf/ (where fa:fa equals your user account) to be able to download any custom soundpacks or maps later. To be able to hear your enemy in-game we need to fix potential sound problems by running sudo apt-get install esound. If you've still got sound problems, run sudo apt-get install vim to install a great text editor, executing sudo vim /etc/init.d/etSoundFix.sh, pressing the i key to enter vim's Insert mode, entering echo “et.x86 0 0 direct†> /proc/asound/card0/pcm0p/oss and pressing ESC followed by :wq to save the file and leave vim. The only thing left to do is setting the correct permissions by running sudo chmod +x /etc/init.d/etSoundFix.sh and adding it to our startup daemon by executing sudo update-rc.d etSoundFix.sh defaults. (Don't worry about the warnings at this point, it just grumbling that we didn't include any LSB information to our file.) Uninstalling Enemy Territory Unfortunately there is no uninstallation routine included in Enemy Territory's installer, so you'll have to uninstall it manually by doing:
-
I was thinking about putting Ubuntu over Windows 8. I just don't know if my ET files would be affected. I was thinking about saving them on Dropbox, or a external usb flash drive, and then transferring it back onto the newly installed Linux. I don't know If i would have to install ET 2.60b for linux though in order for it to run. Anybody have any suggestions on how to approach this so I don't lose my ET files, but still have it run on Ubuntu 14.04? NEVERMIND GUYS I GOT IT
-
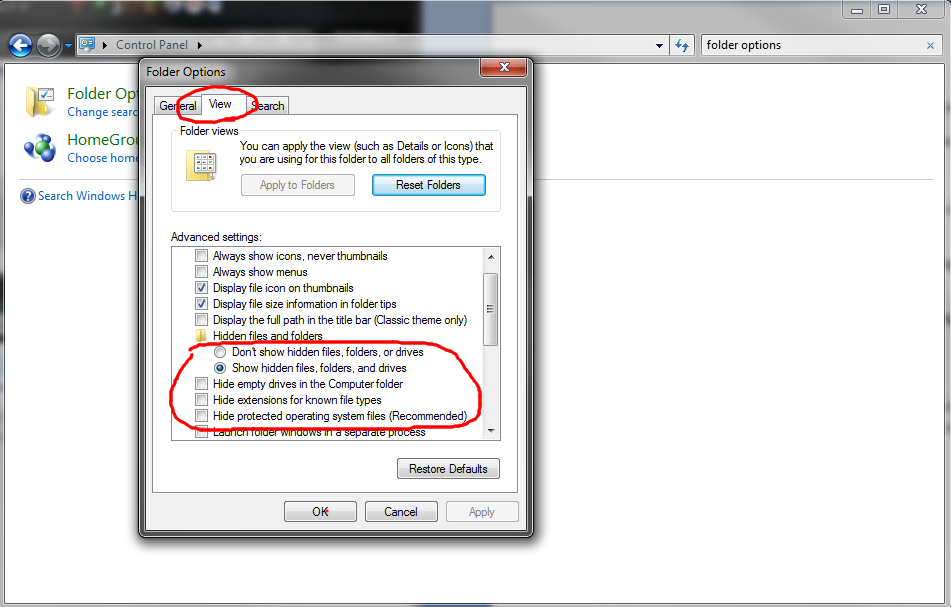
After making a demo, where is it stored? This tutorial will explain how to find your demo folder. - There are other tutorials on how to make a demo or screen shot. This one is how to find your demo file. I made this tutorial because many people were not able to locate their demos folder. - Usually you can find it by going to the demos folder directly, which is usually located under one of these locations: C:/Users/[computer name]/AppData/Local/VirtualStore/Program Files (x86)/Activision/Call of Duty 4 - Modern Warfare/main C:/Users/[computer name]/AppData/Local/VirtualStore/Program Files (x86)/Activision/Call of Duty 4 - Modern Warfare/players C:\Program Files (x86)\Steam\steamapps\common\Call of Duty 4\main\demos - Now, you probably won't find the AppData folder because it is hidden. To be able to view hidden files, go to your folder options under control panel. The steps are shown below: Step 1: Click on control panel, under start: Step 2: Search for: Folder Options and then click on folder options. Step 3: Make sure to have "Show Hidden Files, Folders, and Drives enabled Now you should be able to see the Appdata folder and find the demo folder. - It is also possible to go to your C: drive and search "Demo" to find the demo folder.

-
ubuntuforums.org has been hacked. Just thought I would share the email which I received.
-
I have the Logitech G9x gaming mouse, and really want to migrate back to Ubuntu ASAP. However, my mouse requires SetPoint because all settings are based on profiles.. Even the DPI + and - is based on defined DPI levels in your profiles in SetPoint.. But obviously SetPoint doesn't support linux, and HidPoint or whatever it's called doesn't say it supports the G9x - and even if it did, I don't believe it has X and Y DPI control or 'profiles'.. Is there anything I can do? Can I run setpoint in WINE and have it control my mouse? Never had to deal with software-dependent hardware.. Chuck
-
How to install a custom map on your call of duty 4 (COD4) server: First you should get an FTP client to upload the maps and set the permissions correctly so that people will be able to download them with a decent speed (cl_wwwdownload 1). In the FTP client you connect to (where ever you host) with your cpanel username and password, once in, you go to your gameservers folder (the one named ip-port), in there you have to create a folder named 'usermaps' and in this folder, you have to upload the custom mapfolders. You shouldn't upload the iwd and ff files directly into the usermaps folders, they have to be in a subfolder which is usually the same as the name of that specific map. In this folder you have to upload the iwd and ff files. Usually the zip containing the custom map already has a subfolder named as the mapname. Note that you should keep the original filenames, renaming the files gave me some problems before although I'm not sure if it was because of this. Anyway, once uploaded you will end up with e.g. /ip-portofyourserver/usermaps/mp_cluster/mp_cluster.iwd If you uploaded the maps, you rightclick on the usermaps folder and select 'Chmod' or 'Change permissions', you have to chmod the complete usermaps folder (including subdirs and files) to 755, this is so that people are allowed to download them with cl_wwwdownload 1. Regards, Adrian
-
To create an HTML file Open Notepad or any plain text editor. From the File menu, choose New. Type the following lines:<HTML> <HEAD> <TITLE>Top HTML Tags</TITLE> </HEAD> </HTML> From the File menu, choose Save, and name the file First.htm. Leave the file open in the editor. Switch to your browser, and from the File menu, choose Open, or type file://C:/webpages/first.htm in the browser's URL edit box. You should see a blank page with the window caption "Top HTML Tags."Notice the tags are paired and are included in angle brackets. Tags are not case-sensitive, but capitalization is often used to make tags stand out. The tag <HTML> starts the document, and the tag </HTML> ends it. Ending tags (not always required) are the same as the starting tag, but have a forward slash (/) in front of the tag. There should be no spaces between the angle bracket (<) and the start of your tag. Switch back to Notepad, and after the </HEAD> line, type:<BODY> HTML is swell. Life is good. </BODY> From the File menu, choose Save. Switch back to your browser and refresh the page.The words will appear in the client area of your browser's window. Notice that your carriage return is ignored. If you want to have a line break, you must include a <BR> tag after the first line. For all the steps that follow, insert the text anywhere between <BODY> and </BODY> to add to the body of your document. Add a header:<H3>Here's the big picture</H3> Add an image, using a .gif file saved in the same directory as your page:<IMG src="yourfile.gif"> Add a list:<UL>Make me an unordered list. <LI>One programmer</LI> <LI>Ten SDKs</LI> <LI>Great Internet Apps</LI> </UL> To number the list instead, use paired <OL> and </OL> tags in place of the <UL> and </UL> tags. That should get you started. If you see a great feature on a Web page, you can find out how it was created by examining the HTML source. HTML editors such as Microsoft Front Page can be used to create both simple and advanced pages. Here's the entire HTML source for the file you've been building: <HTML> <HEAD> <TITLE>Top HTML Tags</TITLE> </HEAD> <BODY> HTML is swell.<BR> Life is good. <H3>Here's the big picture</H3> <IMG src="yourfile.gif"> <UL>Make me an unordered list. <LI>One programmer</LI> <LI>Ten SDKs</LI> <LI>Great Internet Apps</LI> </UL> </BODY> </HTML>Source:http://msdn.microsof...4(v=vs.71).aspx That's all for the first steps. Regards, Adrian
-
Counter Strike: Source tutorial on how to add yourself or first admin in mani admin mod The first time you add an admin to Mani admin plugin isn’t as easy as the times after, but once you have done this, you won’t have to do it again. Simple open cfg/ mani_admin_plugin when connected to your FTP server, and edit or create the file named “clients.txt” { "version" "1" // This key group lists all your client players "players" { // This must be a unique client name "YOUR NAME" { // Client real name "name" "YOUR NAME" // Steam ID for client "steam" "STEAM ID HERE" // These are personal access flags for a player "flags" { "Immunity" "grav ping afk a b c d e f g h i k l m n o p q r s t u v w x" "Immunity" "y autojoin" "Admin" "q2 q3 grav pban A B C D E F G H I J K L M N O P Q R S T U V" "Admin" "W X Y Z a b c d e f g i k l m o p q r s t v w x y z client" "Admin" "admin spray" } } } } In this file, replace where is says “YOUR NAME” twice with your name, and then change “STEAM ID HERE” with your steam ID, then save the file and restart your server. Regards, Adrian
-
Download this file: mc002301.mac Extract it to: /Users/your_username/Library/Application Support/Call of Duty 4/pb/dll/ /Applications/Call of Duty 4.app/Contents/Call of Duty 4 Data/pb/dll/ or /Applications/Call of Duty 4.app/Contents/Call of Duty 4 Data/pb/ Just in case, you need to download these files from evenbalance as well: PB Client v2.301 for Mac Filename: mc002301.htm PB ClientA v1407 for Mac Filename: ma001407.htm Copy these files to: /Applications/Call of Duty 4.app/Contents/Call of Duty 4 Data/pb/htm/ Users/your_username/Library/Application Support/Call of Duty 4/pb/htm/ Finally, download pbsec.htm from evenbalanceand move it to: /Users/your_username/Library/Application Support/Call of Duty 4/pb/htm More detail steps if you get stuck on previous steps: You do need to do this manually there isnt an update in the App Store. To get to the Library folder in Mac OS Lion click on the "GO" menu top left of the screen and hold down the alt/opt key next to command key. This will allow you to see the 'Library" folder. Click on that to get to cod4 user name/ Library/ Application Support/ Call of Duty 4/ pb/ dll You need to have the three files one is the latest PB file for Mac. ma001407.mac (this one is already there) mc002301.mac download here (http://support.aspyr...me=mc002301.mac) or (http://www.dynamicla...c002301.mac.zip) You need to put the mc002301.mac file in the application as well so Applications/ Call of Duty - Modern Warfare.app (right click to show package contents)/ Call of Duty 4 data/ pb there will prob be 5 other files there just put it in there. the tutorial says to put them in a dll folder inside the pb folder but there wasn't a folder and i just have it in there and it worked. The .htm files you need (http://www.evenbalan...age=dl-cod4.php) These 3 files all go here (user name/ Library/ Application Support/ Call of Duty 4/ pb/ htm) mc002301.htm (http://www.evenbalan...d4/mc002301.htm) ma001407.htm (http://www.evenbalan...d4/ma001407.htm) pbsec.htm (http://www.evenbalan.../cod4/pbsec.htm) in Firefox it just downloads the file you want. in Google ChromeThere will be a lot of words on a blank page just do a save as and it will be like pbsec.htm.html just delete the html part after downloading. the pbsec.htm file dissapears after you log back in i believe because it is no longer there in my folder.
-
Hey guys.. With my new harddrive coming tomorrow, i'm frizbee'ing my windows disc out the window and going back to Linux. Had enough of Windows' bullshit. I find myself in a predicament though. I tried Kubuntu before but always used Ubuntu because I like GNOME... But KDE is apparently superior, especially for offsite management etc.. I like how Kubuntu looks too.. And I'm looking to use it rather than Ubuntu this time.. Can anyone give me a reason NOT to use Kubuntu? Is there anything I'm unaware of..? Anything that might cause me a problem? Seriously, post ANY annoyances you know of about Kubuntu - I can then look to see if that will affect me at all.. Thanks folks Chuck