Search the Community
Showing results for tags 'MINECRAFT'.
-
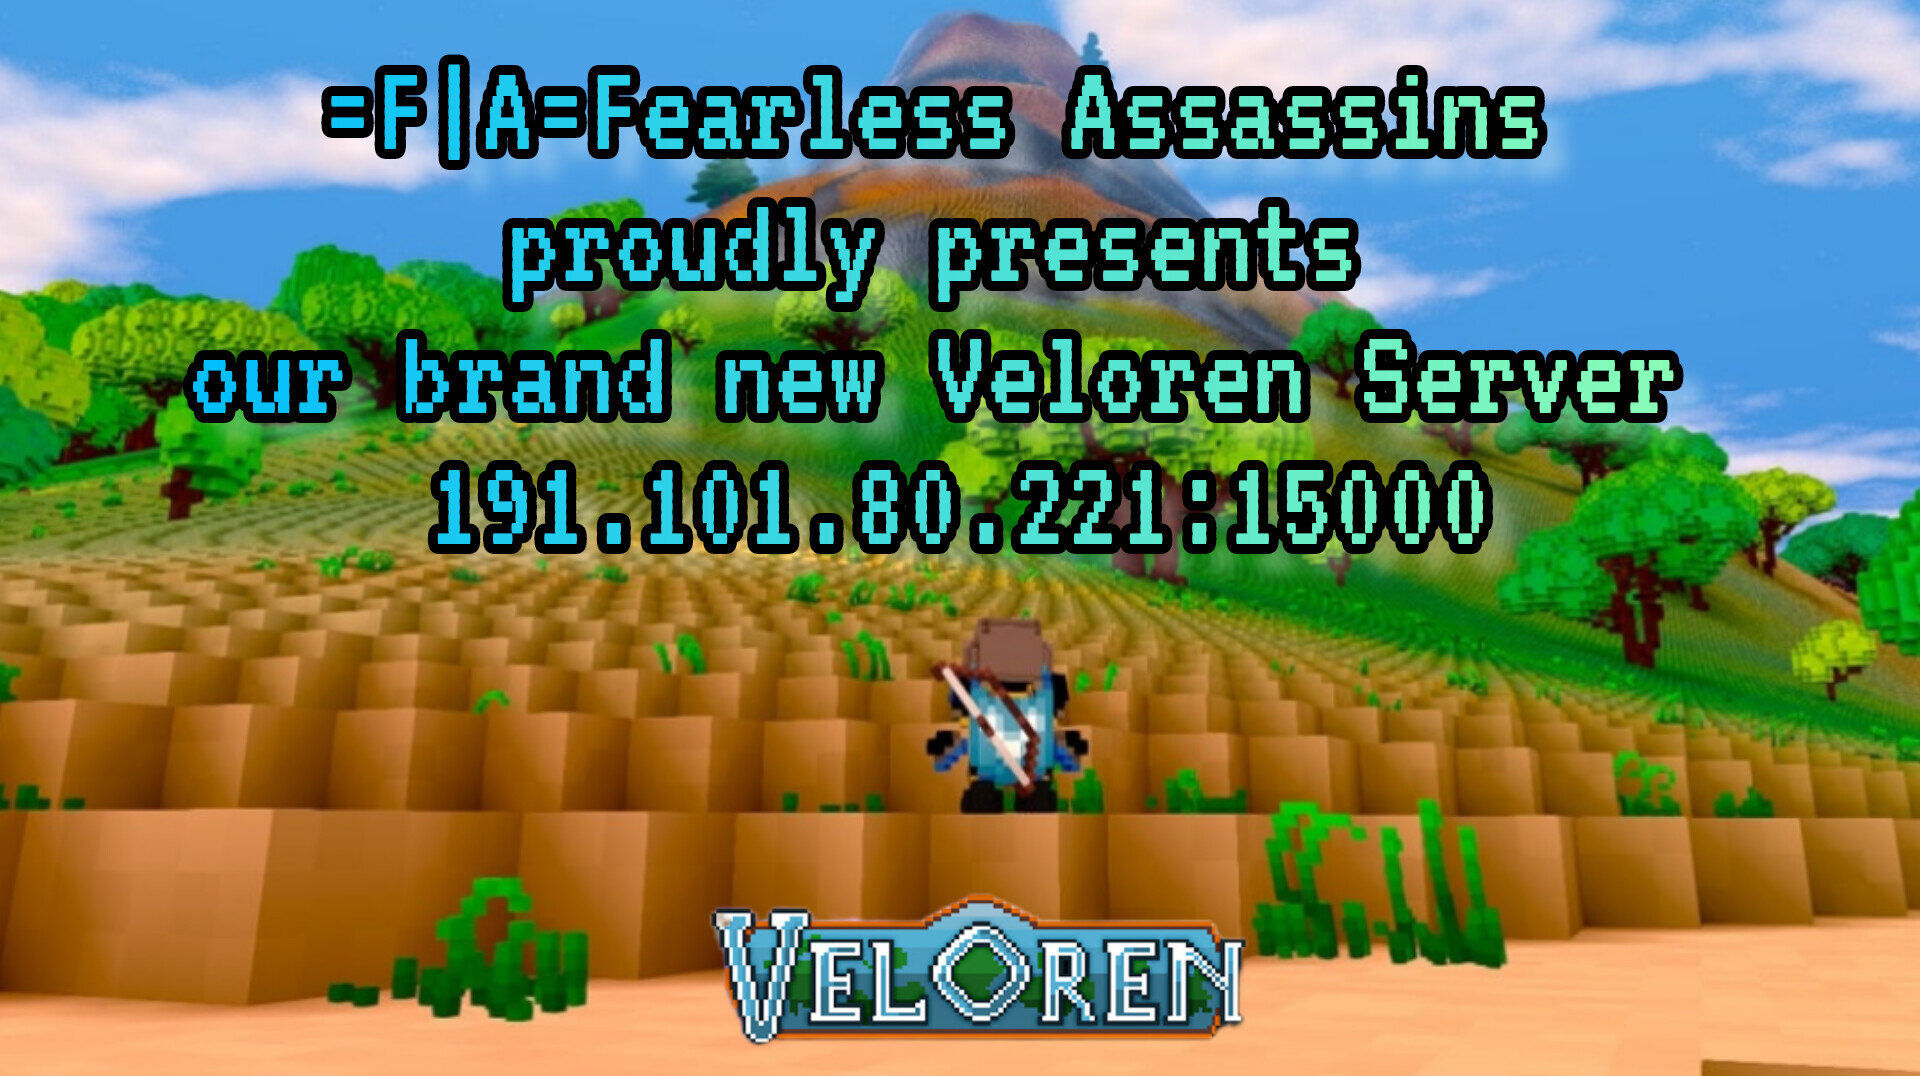
veloren.webm =F|A= proudly presents to you, our new game we are hosting: VELOREN Veloren is a multiplayer voxel RPG written in Rust. It is inspired by games such as Cube World, Legend of Zelda: Breath of the Wild, Dwarf Fortress and Minecraft. And the best part, it's free and easy to play. Download the game, create a profile, and start your game. 191.101.80.221:15000 More details on @Zanda 's post here:

- 25 replies
-
- 18
-

-

Minecraft Better PvP Mod - Support PvP in Minecraft
curseforgecraft9595 posted a topic in Other Games
Better PvP Mod for Minecraft adds a bunch of useful features to Minecraft for use in both PvP combat and Survival/Hardcore modes. Better PvP Mod 1.16.5 adds a fully customizable GUI system, including various skins and free customization, such as a minimap, armor status, poison status, etc. There are also many valuable keybinds for more comfortable gameplay, one of which is an action bar system similar to an RPG. Main features of Better PvP Mod Minimap interface: above or below the ground. The interface displays the poison effects being used. The interface displays information about the armor and items that are equipped for the character at the moment. The interface displays the number of arrows remaining and the vertical angle of view. Quick use is a system similar to the action bar, which can automatically use the item set on the Hotbar without switching back and forth between the items in use. Holding the keybind helps you to continue using the item while right-clicking. For example: having a flashlight, TNT, throwing poison, eating, drinking... Quick eat is added to an existing feature, allowing intuitive eating when holding down the keybind set. Better sprinting when holding down a keybind. You can set the W key to replace it. Turn stealth mode on or off without pressing a button. The notification system on the screen allows energy levels, low HP, fire risk, being shot by arrows... The amount of XP gained or lost on the screen. Edit mode: You can move the interface anywhere by pressing the C/F key to suit your PvP needs. Settings: can be turned off or on at any time. Customization: Some skins allow customization on the Minecraft Mod's GUI. See More: Better PvP -
Minecraft OnePunchMan Mod - Possesses the same power as One Punch Man
wminecraft posted a topic in Other Games
OnePunchMan Mod 1.16.5 will introduce a new item into Minecraft. When activated, this item will grant the player the power of the main character Saitama in the popular Manga - Anime series One Punch Man. Known as the strongest hero that ever existed, Saitama can destroy any entity with a single punch. Moreover, he is also invincible and possesses incredible speed, enough to surpass anyone. Sounds pretty tempting, doesn't it? With Mod One Punch Man, you will have the opportunity to become an undefeated puncher through an armor and sword added to the game. But of course, the tremendous power in OnePunchMan Mod doesn't happen by accident - you can only get this terrible power through an expensive crafting recipe. Of course, once you have the power of Saitama in your hands, no monster or hostile entity can hurt you. Suggestions for others mod: Remove Potions Icons: To remove annoying Potions Icons from the screen Easy Diamond: To facilitate crafting if the mod is too expensive for you Easy Emerald: To facilitate crafting if the mod is too expensive for you OnePunchMan Mod Download Link : OnePunchMan Mod Suggestions for others mod: Remove Potions Icons: To remove annoying Potions Icons from the screen Easy Diamond: To facilitate crafting if the mod is too expensive for you Easy Emerald: To facilitate crafting if the mod is too expensive for you The Way to Put in Minecraft Forge? Minecraft Forge can be really a Modding API which means it is rather simple to put in a range of different Minecraft mods. Go to the Forge internet site, pick the Minecraft variant you want to conduct out of the side bar on the left, and then down load the installer. Open the .jar document you’ve just downloaded, then ensure’ Setup client’ is selected and then click okay. Once that’s finished you’ll find a success message. You should see that the Minecraft Forge text at the lower left-hand corner and a Mods button below the multi-player. -
End Remastered aims to make your Minecraft experience more challenging by emphasizing the adventurous side of the game. In brief, 11 new Ender Eyes are added along with a giant castle and a challenging dungeon which replace Vanilla Strongholds. We currently support 1.16.3, 1.16.4 and 1.16.5 (We have a beta release for 1.16.1, but we would not suggest using it, since it lacks so many features due to incompatibility.) Exploration is the main focus of End Remastered, "It's not the destination, but the journey." In order to go to the End and beat the Ender Dragon, you will have to find the 11 custom eyes by exploring vanilla structures and fighting vanilla bosses. Once you have the eyes, you have the choice to follow them until you reach an End Gate or to trade with a Cartographer to obtain a map to the End Castle. After reaching one of these structures, you will have to find the hidden portal room, place your eyes in the portal frames and, finally, activate it by using a powered core on the End Creator (the grey frame) The Eyes are a really important part of End Remastered, just like Vanilla Ender Eyes, they allow you to activate the portal to the End. However, unlike Vanilla Ender Eyes, they are not dropped by Endermen but must be found by exploring, fighting and mining. For more info, click the spoiler tag below or learn more about them by clicking on the banner above this paragraph. 1. Old Eye - Found in Desert Pyramids Legends say this eye once belonged to one of the great Sandworms 2. Nether Eye - Found in Nether Fortresses It was lost by a demon in the battle between the Aether and the Nether 3. Cold Eye - Found in Igloos One of the last artifacts left behind by the Iceologers before they all suddenly vanished from the world 4. Rogue Eye - Found in Jungle Pyramids This eye is believed to have given our ancestors the knowledge of Redstone 5. Black Eye - Found in Buried Chests Pirates say it gave sight to the legendary Black Pearl 6. Magical Eye - Dropped by Evokers Without this eye, the Evoker has no power 7. Lost Eye - Found in Mineshafts It is told that it was forged by the first blacksmiths of time 8. Corrupted Eye - Found in Pillager Outposts The eye of a greedy king that faded in solitude. Legend says it will bring infinite fortune to its owner 9. Wither Eye - Dropped by The Wither Has witnessed destruction. Maybe it also witnessed your stuff disappear 10. Guardian Eye - Get it by Killing Elder Guardian It has seen many warriors drown into the depths of the sea 11. End Crystal Eye - Get it by crafting it using the End Crystal Fragment, a new ore. It is believed to hold a fragment of the Enderdragon Soul Download Mod : end remastered mod
-
This tutorial will not teach you how to build planes, nor will it help you master the art of command blocks ( other tutorials already do ), but is more of a starter pack for any player. wishing to modify Minecraft a little bit. In order to have a good base, this starter pack , although equipped with Optifine , requires a somewhat powerful PC to run the shaders , which remain optional. There was a time when Optifine and Forge were not compatible and it was really annoying because the player was faced with a difficult dilemma: to play with an optimized game and beautiful graphics, or with a game not optimized but with many mods . This has been corrected for some time, we can combine everything! Download Optifine with Forge All Version Reinstall Minecraft To start, I have only one thing to advise you, uninstall Minecraft and reinstall it! I will guide you step by step to start on a good basis. Uninstalling Minecraft: To properly uninstall Minecraft, go to the Start menu , then go to Run . If not, make Windows key + R . Then type % appdata% in the search bar and then go to the .minecraft folder . You should have something that looks like this: Remember to back up things you want to keep like maps, Resource Packs , etc. Once done, delete all the files. Here, Minecraft is uninstalled, we will be able to leave on a clean basis. Moreover, if at the end of this tutorial, you notice that you cannot get Forge + Optifine to run , repeat this part of the tutorial. Another option is to run the Minecraft installer if you still have it and simply click on remove. Personally, I prefer the first solution. Installation of Minecraft: To install Minecraft, nothing very complicated. You will have to start by going to the official Minecraft website and downloading the Java version of Minecraft. Select the platform Choose your OS Take the Java Edition version Download Minecraft Now just launch minecraftinstaller.exe and click on next till finish. When finished, let the software launch Minecraft so that it downloads the latest updates. Now you need to select the version of Minecraft you want to play on. Currently, the latest version of Minecraft that supports Optifine as well as Forge is 1.14.4 . When Optifine 1.15.2 will be compatible with Forge , the procedure will be identical, it will just be necessary to replace version 1.14.4 of Minecraft by version 1.15.2. Do not hesitate to consult our article on Optifine to find out if Optifine is compatible with Minecraft 1.15.2 Here is the procedure to follow : In the launcher, click on the Configurations tab Then click on the New button . Give the name you want to your configuration Choose Minecraft version 1.14.4 Then click on Create Go to the Minecraft launcher configuration menu Create a new profile to download Minecraft 1.14.4 You can now select the profile you just created in your launcher . Launch the new profile for the first time to download the Minecraft 1.14.4 files . Selection of the new profile with Minecraft 1.14.4 Downloading Minecraft 1.14.4 Files Preparations : Without going into details, you just have to know that you are going to need 3 things: Optifine - Forge - Shader Keep in mind that these 3 files are your starter pack when you want to go on a new installation. Keep them under the elbow, it can always be useful. Please feel free to check back regularly if there have been no new updates. We regularly maintain links to these articles. Installation of Optifine, Forge and a Shader: In itself, there is nothing complicated but given the many comments from visitors who cannot install everything, this tutorial will help more than one! Installation of Forge: You must install Forge first! To do this, just click on the .jar file that you downloaded and start its installation. Remember to download version 1.14.4 or the one that corresponds to the version of Minecraft on which you want to play. If you are unable to launch the Forge .jar file, be sure to install Java . You can download it at this address . Then simply launch the installation of Forge by selecting Install Client then clicking OK: Launching Minecraft Forge with double clicking on the file Forge installation in progress In order to complete the Forge installation, launch Minecraft, then select the Forge profile . Then click on Play and the Forge folders will generate in your .minecraft folder . Installation of Optifine: Optifine without Forge can be installed simply by double clicking on it. It has an installer as convenient as Forge. However, here we are going to install it in a different and similar way to the mods you might put. Simply drag the OptiFine file (1.14.4 in our case) into your mods folder . As a reminder, to go to this folder, go to the Start menu , then go to Run . Otherwise, do Windows Key + R. Then type % appdata% in the search bar, then go to the .minecraft folder and then to the mods folder . Simply drag your OptiFine file into the mods folder and you're almost done. Relaunch Minecraft and click Play again . Once in game, go to the options menu, click on Options> Video Settings> Shaders If you see this button, the installation was successful. Installation of the shader: This part of the tutorial is optional . If you don't have a capable pc, you can skip this step. There is a wide choice of Shaders, including Sildur's Vibrant Shaders , Sonic Ether's Unbelievable Shaders (better known by the abbreviation SEUS) and many more, which you can find in our Shaders category . Go to the .minecraft folder again. As a reminder: Go to the Start menu , then go to Run . Otherwise, do Windows Key + R. Then type % appdata% in the search bar and then go to the .minecraft folder . Then drag the shader zip into the shaderpacks folder. Then launch Minecraft. Go to options, click on Video Settings and shaders: Select the shader you downloaded and let the game load the shader, which may take a little while. When done, click Done.
-
What about Minecraft ? For a few years now, it has been almost impossible not to see cubes everywhere. Books, videos, conventions, goodies,… Minecraft is everywhere, and arouses as much interest and passion as it does controversy and debate. If you are visiting Minecraft-France for the first time, let yourself be guided and find out what Minecraft is! What is Minecraft? Developed since 2009 by the Mojang studio , Minecraft is a video game now available on consoles, PCs and mobile devices and which consists of a huge sandbox offering players almost endless possibilities. Construction, survival, combat or even mechanisms: Minecraft offers players a large number of occupations and also benefits from a dense and varied community regularly offering new content that we present here. In Minecraft, the player is free to roam an absolutely gigantic world (almost eight times the area of the Earth) made up of blocks to destroy, craft and transform. Extremely dense and comprehensive, this modern day sandbox will allow adventurers to explore vast biomes and caverns in search of resources, creatives to build whatever they see fit, and engineers to create simple or incredibly complex mechanics. . Whatever your interests or passions, Minecraft is very likely to interest you. Even if its visual can be unsettling, the discovery of this three-dimensional world composed of blocks with simplistic textures has today fascinated an absolutely indefinable community, as much by its importance as by its diversity. Adults and children alike, Minecraft allows many enthusiasts or neophytes to have fun, learn, create, experiment, and sometimes even live. Gradually, the cubic universe has become the digital successor of these good old LEGOs . The medium has changed, but the pleasure remains and is now shared with disconcerting ease. This section will allow you to discover the different aspects of this universe: game modes, additional content, communities, multiplayer activities,… Engineers, builders and adventurers, we hope you enjoy your visit! Minecraft history The development of Minecraft was initiated on May 10, 2009, by Markus “Notch” Persson. The very first version of the game will be released a few days later, on May 17th, in Classic version 0.0.11a. This version is extremely basic and has little to do with the base game: you earn points by killing monsters and only a few blocks are available. But despite its age, the Classic version is still playable today for free on the official Minecraft site. The development of Minecraft is growing rapidly in versions Indev (In Development) and Infdev (Infinite Development), which are published from December 23, 2009. The craft is set up and the tools are notably appearing. The Infdev, in particular, revolutionized the Minecraft of the time by offering infinite maps. The Alpha version was launched on June 28, 2010, adding, among other things, biomes, the Nether , the possibility of creating Redstone circuits , but above all the possibility of playing survival mode in multiplayer. The game then costs € 9.99. The Beta marks a turning point in the history of Minecraft on December 20, 2010. It is released shortly after Minecraft's victory at the Indie of the Year 2010. The beta greatly improves the multiplayer version, fixes many bugs and adds several blocks. . Minecraft price drops to € 14.95. The development of the Beta version will last nearly a year, adding Endermen, creative mode, NPC villages, sprint, hunger bar, new combat system… All of these features are still central in the current versions and which will prepare the ground for the version. Minecraft “Finale”, released on November 18, 2011, at MineCon, the very first Minecraft convention, held in Las Vegas. This version 1.0.0 will be released by Notch, live, by lowering a lever similar to those in Minecraft. The game then costs € 19.95. Shortly after the release of the final version, Markus “Notch” Persson , creator of Minecraft, left the development team to devote himself to other projects. It's Jens "Jeb_" Bergensten takes its place of Chief Developer. This so-called final version continues to exist and regularly undergoes updates, most often thematic. Let us quote for example the update 1.5, released on March 13, 2013 under the name of Redstone Update , which adds the essential Command blocks and totally reinvents the way of doing Redstone, but also the “Update that changed the world ”, Published on October 25, 2013 (version 1.7), which gives pride of place to biomes and aesthetic additions. At the same time, an Xperia version of Minecraft was released shortly before the release of the Final version on PC, on August 16, 2011. Once Sony's exclusivity ended, Android and iOS in turn offered Minecraft, a pocket edition, for 6, € 99, respectively in October and November of the same year. On May 18, 2012, Minecraft becomes available on Xbox , for around twenty euros. This version is not maintained by Mojang, creator of Minecraft PC, but 4J Studios. This version was very successful and broke the sales records of the time. The same year, a new Minecon takes place at Disneyland Paris on November 2 and 2. A month later, Minecraft is released on Playstation 3 . On September 4, 2014, Minecraft Console Version (on PS3 and Xbox) was released on Playstation 4 and Xbox. A few days later, Markus “Notch” Persson announced that he had sold his shares in the company Mojang, owner of Minecraft, for 2.5 billion euros to Microsoft. Minecraft therefore falls under the fold of Microsoft, which announces a Windows Phone version shortly after. The different platforms Minecraft, a multi-platform game! Following the success of Minecraft originally developed only on PC, a port was made on different platforms (Windows, Mobile, Playstation, Xbox, Nintendo etc.) for players and also to acquire a new audience. It should be noted that there are platforms where the game was released such as Raspberry or Xperia play which have since been outdated and which no longer benefit from an update. Minecraft is compatible on many platforms. To buy the game on your favorite medium, you can consult this page which lists all versions of Minecraft .
-
- 1
-

-
Minecraft Smart Moving Mod Minecraft version: 1.8 (Crawling, Climbing, Diving)
wminecraft posted a topic in Other Games
Smart Moving Mod adds lots of cartoons and new capabilities, giving two controllers which you want to key bind, the sprinting key, along with the catch key. Smart Moving Mod is quite intuitive. It has controls allowing for plenty of new functions that enable you to navigate the terrain considerably quicker, smoother, and complete far more efficiently. Download Mod : Smart Moving [1.8] Hang on to ledges Do you want to climb a cliff on an expedition, but your one-meter-high jumps are not enough to climb? With Smart Moving, hang on to the edges and lift your cubic body with the strength of your arms! Step 1: Press the “grab” key ([CTRL] by default) Step 2: Go forward, while remaining pressed on “grab” Continue until you reach the top of the wall And There you go ! The two-block-high wall is no longer a problem now! For walls three blocks high, just jump, then do the same things. It is even possible to climb a wall four blocks high, we will see that later. Do you want to climb a wall made up of spaced slabs? No problem. Step 1: Press “grab” Step 2: Move along the slabs while remaining pressed on “grab” Hang on to bars and barriers Go over a barrier, or a fence? Easy ! Step 1: Press “grab” Step 2: Go forward while remaining pressed on “grab” Climb a barrier…… or hang yourself on iron bars. You can also climb on traps. Crawl Want to enter a tunnel, but the opening is only one block, and therefore too narrow for you? You just have to crawl. Step 1: Press the “sneak” button Step 2: Press the “grab” button Step 3: While holding both keys, move with your stomach to the ground. Slide As in any good self-respecting action movie, do you want to pass, narrowly, under a door that slips shut? Let's go. Step 1: start running Step 2: Press “grab” Step 3: Keep pressed on “grab”, and press “sneak”. To dive Want to take the plunge into the pool, but in an elegant way? Not very complicated. Step 1: start running Step 2: Press “grab” Step 3: Keep pressed on “grab”, and jump High jump I told you earlier about climbing a wall four blocks high, well the time has come. Thanks to the high jump, you can jump two blocks in height, and by repeating the operation from earlier to climb a wall, you can climb a wall of four blocks without too much difficulty. Step 1: Sneak Step 2: Still in sneak, hold the jump key You will see a bar above the life bar load, wait for it to be complete Step 3: Release everything Side jumps and back jump Want to imitate Link, and jump in all directions? Very good. Step 1: Quickly press the left, right or back button twice Flight and swim animation Have you always dreamed of flying in style, like Superman, and not standing up? Have you always dreamed of swimming normally, like everyone else, and not standing up? So, I tell you that this mod is really for you. You just need to fly or swim normally. The animation is replaced, and it's much better that way. To steer, simply move forward by moving the cursor in the desired direction. To return to the surface, under the sea, you no longer have to press the jump key, you just have to point the cursor towards the surface, and move forward (of course, to ascend faster, press the jump key is convenient). The same goes for theft. To move up and down, just point the cursor up or down, and move forward. Climb the ladders This mod also adds a new ladder system: you must now be turned towards the ladder to be able to climb it, which adds an effect of realism. An animation has also been added. If you don't count 16 movements (as I said at the beginning of the article), it is because some are not functional, and I have grouped several movements under the same title. A speed increase / decrease function is available, just press i to reduce its speed, and o to increase it. To activate / deactivate the mod, press [F9]. Maps made for Smart Moving A collection of maps made by baeshra . A map paying homage to the game Mirror's Edge . A Parkour map created by Bloxcraft . A very good Parkour map created by Binix . A training / challenge map created by Blue_Legion . A map challenge created by JetfireBlack . A training map created by George3636 . A quest map created by black00ut . An obstacle course created by cavesticks12 . A map challenge created by Random_Asian . A running training map created by LaBarata . A very big Parkour map created by TheNewbiesMines . -
ToggleSprint is a mod that allows you to switch to a sprint. How to use Toggle Sprint The button to switch to sprint is your button to run. You can change this in your Minecraft settings. Choose a color for the text. Activate the Badlion Client font for the text. Choose between classic and icon for the rendering mode. Toggle Sprint text on / off. Custom text for when Toggle Sprint is enabled. Change flight speed (This may be considered cheating on some servers. Be careful!). Activate / deactivate a separate key. Choose another key if the above option is enabled. How to install Toggle Sprint Mod With Forge Make sure you have Minecraft Forge If not, Download and Install the latest version of Minecraft Forge Download Toggle Sprint Mod file from link(s) below/above On PC Windows, Go to the Start menu Type: %appdata%/.minecraft Press Enter to Run %appdata%/.minecraft On MacOS open finder, hold down ALT and click Go then Library in the top menu bar. Open the folder Application Support and look for Minecraft. Go to minecraft/modsfolder If Mods folder does not exist, create one Put Toggle Sprint Mod file into the mods folder Launch Minecraft using Forge Profile, then Open Menu Enjoy! Download Toggle Sprint Mod for Minecraft 1.14.4/1.13.2/1.12.2/1.8.9 toggle sprint mod 1.8.9
-
Legends Core 1.7.10 is your core-mod that the Legends Modding Team's mods run out of. This mod must be set up so as to utilize any of those others. Requires: How to install Legends Core? Install Minecraft Forge on your computer Find the Minecraft folder. On Windows, open Run from the Start menu, type %appdata% and then click Run. On the Mac, open Finder, hold the Alt movie, and choose Go>Library in the top menu bar. Open the Application Support folder and look for Minecraft. Put the Minecraft Mod you just downloaded (.jar file) into the Mods folder. When you open the game Minecraft and press the Mods button, you will see the mod is installed. Play Minecraft, Enjoy. Legends Core 1.7.10 Download Links: legends core 1.7.10
-
Minecraft Download link for Cocricot texture pack: [MineCraft}
wminecraft posted a topic in Other Games
A revolutionary pack in the pursuit of “aesthetic”, Cocricot Minecraft Resource Packs is a stunning European – architecture – inspired pixel pack that’s been featured on the Minecraft official news page despite not having a Marketplace listing. As Marsh Davies, the writer of this article, aptly described this Japanese-made pack: “It’s gorgeous. I love it. It makes me feel warm and comfortable and strangely sad at the same time.” While it can be used as a breathtaking standalone pack with beautiful chiseled details, custom leaf models and exquisite art, Cocricot also offers a mod that adds hundreds of new furniture and decor blocks into the game, creating a completely new, comforting experience within Minecraft (and giving your aesthetic instagram page one heck of a boost). Requires: How to install: Download a resource pack, you should get a .zip file.v Open the folder to which you downloaded the file. Copy the .zip file. Open Minecraft. Click on “Options”, then “Resource Packs”. Choose “Open resource pack folder”. Paste the file into the resource folder in Minecraft. Go back to Minecraft, the resource pack should now be listed and you can activate it by choosing it and hitting “Done”. Download link for Cocricot Minecraft Resource Packs: cocricot texture pack -
Add Gems & Jewels Mod in your Minecraft Minecraft mods are an independent entity, compared to vanilla Minecraft. In order to add modifications in Minecraft, you are required to install specific APIs. Basically, there are two famous API that Minecrafters use that is Minecraft Forge API and Minecraft Fabric API. Today, we are providing Minecraft Forge API mod installation which is fairly easy. In the start, you are bound to download Minecraft Forge API, it can be the installer or .jar universal. Consequently, it will be a lot easier to create a Forge Profile. Similarly, you will need to install the required modification which you want to play. Then Go to “C:/Users/YOUR USER/AppData/Roaming/.minecraft/mods” or to an equivalent on other OS’ and put the jar file you’ve just downloaded there. Lastly, check the forge profile and there you can see the added mod. But sometimes it does not show there. Don’t worry, just restart the Minecraft and it will work perfectly. So have fun playing Minecraft with your favorite modifications. The mods are available right here are purely from the developers itself. We always take real good care of the source as well. It’s our humble request to please inform the MinecraftYard team if you find any broken or not working link. We will make sure that it’s fixed within a few hours. Additionally, we don’t provide fake links or disguise the fans. Download Mod : Gems Jewels Mod
-
Even the smallest changes in the game can be the basis for pleasant gameplay. For example, today we offer you to use a texture pack called Jerm's Better Leaves 1.14 for Minecraft. Thanks to these changes, you will be able to evaluate the new design and the quality of the leaves. Now you can enjoy almost every moment of your new adventure. It will be enough just to enter the forest or the surrounding trees for a short time. The game will please with realism, nice design and a good mood for further play. Don't worry, the author has done a great job of improving it and is now ready to share his creation. How to install Jerms Better Leaves Add-on Resource Packs for Minecraft? Download Optifine 1.16 (Only for Minecraft versions 1.16.x). Download Optifine 1.15 (Minecraft versions 1.15.x only). Download Optifine 1.14 (Only for Minecraft versions 1.14.x). Download Jerms Better Leaves Add-on Resource Packs 1.16, Jerms Better Leaves Add-on Resource Packs 1.15 or Jerms Better Leaves Add-on Resource Packs 1.14 Open the .minecraft/resourcepacks folder Paste the downloaded file inside “resource packs”. It’s time to enjoy the new look these textures offer! Download Jerms Better Leaves Add-on Resource Packs for Minecraft jerms better leaves
-
When Dungeons Arise 1.16.5-1.15.2-1.14.4 is a mod that features several pre-designed dungeon patterns, with reasonably different structures from the game’s default dungeons, which will be randomly generated around the world. Where enemies will be generated even during the day. There are dozen of disparate locations with unique themes, some places are benevolent, others are malevolent and accommodate hostile entities who swore their life into protecting their lands. If players manage to conquer one of these dungeons, however, wealth and fortune will be their to grab as precious commodities are hidden inside these monuments. How to install When Dungeons Arise Mod With Forge Make sure you have Minecraft Forge If not, Download and Install the latest version of Minecraft Forge Download When Dungeons Arise Mod file from link(s) below/above On PC Windows, Go to the Start menu Type: %appdata%/.minecraft Press Enter to Run %appdata%/.minecraft On MacOS open finder, hold down ALT and click Go then Library in the top menu bar. Open the folder Application Support and look for Minecraft. Go to minecraft/modsfolder If Mods folder does not exist, create one Put When Dungeons Arise Mod file into the mods folder Launch Minecraft using Forge Profile, then Open Menu Enjoy! Download When Dungeons Arise Mod for Minecraft when dungeons arise
-
Ready your screenshot buttons and start rehearsing your best "naaaaww"s. The final snapshot of the year enters Minecraft Java, and what better way to end the year than with something that has been on our bucket list for quite a while: the adorable axolotl? NEW FEATURES IN 20W51A Amphibious! Axolotls currently love tropical fish, though this may change. Tropical fish or tropical fish buckets can be used to mate axolotls. Axolotls will swim around with you if you’re holding a tropical fish or tropical fish bucket in one of your hands. When a player kills a mob that the axolotl was attacking or being attacked by, the axolotl will show its appreciation by granting the player temporary regeneration and removing any mining fatigue effects. You can pick up your axolotl in a water bucket and carry it around just like a salmon or cod! Axolotls will always chase after squids and other types of fish. Axolotls are skittish, but they will attack Drowned and Guardians if you tempt them with their favorite food – tropical fish! Axolotls do not like it out of the water and will dry up and begin taking damage if they are out of water for longer than 5 minutes. An axolotl will not dry up as long as they are in water or rain. Sometimes when an axolotl takes damage, it will pretend to be dead so that it stops being attacked. There are four common varieties and 1 rare variety of axolotl. Axolotls do not spawn in the world in the world yet, but you can find spawn eggs for them in the creative inventory. Download Links: minecraft 1.17 snapshot download
-
Minecraft Legends Core (Library for Legends Modding Team’s Mods)
wminecraft posted a topic in Other Games
Legends Core 1.7.10 is the core-mod that all the Legends Modding Team’s mods run from. This mod is required to be installed in order to use any of the others. Requires SuperHeroes Unlimited Mod With SuperHeroes Unlimited Mod, you can fly, smash mobs easily, possess special abilities and powerful magic and poison effects. Do not forget to wear sturdy armor to fly in the air, quick reflexes, superhero powers, unique equipment and solid armor. The mod allows players to transform into heroes coming out of their favorite comic books, even villains to master the world. You can easily craft characters, battle bosses, and travel to new lands. All Marvel heroes reunite in SuperHeroes Unlimited Mod. Put your armor on, grab your weapon and start this fantasy adventure! Have you ever faced a Creeper and been blown away? Are you lost in the jungle and do not know your way home? Or simply want to get out of an unequal war? With SuperHeroes Unlimited Mod, the above dreams will be realized. You were born a hero with a close appearance, and the journey to save the world has just begun. There are plenty of superheroes to choose from - each character has their own strengths and abilities for the player to master and wield in combat. Download Links: legends core 1.7.10 -
Special abilities, weapons and armor inspired by Attack on Titan Mod. Attack on Titan Mod adds an energy system that you can use to carry out special attacks with the weapons that this mod adds. The mod allows the players to incorporate the massive and rather terrifying Titans into their Minecraft game. You can also customize your character to bear resemblance to the ones in the original series. The mod provides the ability to fight the Titans that can surprise you through the Minecraft landscape. This mod is inspired by the famous anime/manga “Attack on Titan” or “Shingeki no Kyojin”. How to install Attack on Titan Mod With Forge? Make sure you have Minecraft Forge and NGTLib. Download Attack on Titan Mod file from link(s) below/above On PC Windows, Go to the Start menu Type: %appdata%/.minecraft Press Enter to Run %appdata%/.minecraft On MacOS open finder, hold down ALT and click Go then Library in the top menu bar. Open the folder Application Support and look for Minecraft. Go to minecraft/modsfolder If Mods folder does not exist, create one Put Attack on Titan Mod file into the mods folder Launch Minecraft using Forge Profile, then Open Menu Now you can start experimenting with your Minecraft character’s body! Download Attack on Titan Mod Attack on Titan Mod
-
Timber Mod for Minecraft 1.16.4/1.15.2 and 1.14.4, is a very simple mod that comes into operation right at the time of felling a block of wood from a tree. At that moment acts the mod by dropping all the wood without having to cut down all its blocks. It is practically identical to Treecapitator, but with the Timber, you can edit the “mod_Timber.cfg” file that will allow you to use the mod with those new trees that add other mods. One block chop, many tree drop. Chopping while sneaking will disable the Timber Mod, useful to not chop up your base! How to install Timber Mod With Forge Make sure you have installed Minecraft Forge Download Timber Mod for your version of the game. Locate the minecraft application folder. On windows open Run from the start menu, type %appdata% and click Run. On MacOS open finder, hold down ALT and click Go then Library in the top menu bar. Open the folder Application Support and look for Minecraft. Place the mod you have just downloaded (.jar file) into the Mods folder. Put it in the ‘mods’ folder, which is located in the game folder. Enjoy. Download Links: timber mod 1.16.4
-
Overview of Epic Adventure Resource Pack Epic Adventure Resource Pack is a Medieval Resource Pack, a fantastic fantasy world. Created by Toby109TT, a veteran member of PlanetMinecraft, Epic Adventure Resource Pack has grown in popularity among Dark Medieval Minecraft players. Unique features of Epic Adventure Resource Pack Toby109TT has provided a lot of Epic Adventure Resource Pack versions for Minecraft players. However, the newest and most popular version today is Epic Adventure Resource Pack 1.15.2 and 1.16.1. These two versions make your Minecraft journey more adventurous and epic. While the default Minecraft resource packs are 16×16 pixels, Epic Adventures is 32 by 32 pixels, twice as much detail and resolution as other resource packs. Therefore, this is one of the x32 resource packs most appreciated by many Minecraft players today. Your Minecraft adventures will be taken by Epic Adventure to new horizons you never thought possible. With fun new additions to the game we all know and love – Minecraft, you’ll have even more amazing experiences. Apart from the texture of this resource pack that is twice as detailed as the traditional Minecraft Vanilla texture, what is even better is that they do not have any annoying noises for players. As a result, Epic Adventure Resource Pack offers a more user-friendly interface and a better overall experience. The colour palette is designed with a realistic colour gamut that will surely make players happy. Leaving the usually bright and vibrant colour scheme is a little getting used to, but the Epic Adventure Resource Pack deserves everyone the experience. Players who have used the Epic Adventures resource pack have found that they prefer a more realistic look than the vanilla Minecraft look they’ve seen before On the other hand, Epic Adventure Resource Pack will give you unique sharp images that you have never seen before anywhere. This resource pack will remain detailed, colourful, and incredibly beautiful. This resource pack does not take away anything that players love about vanilla Minecraft, it just adds to the already infinite game. Everything is the same, the game is still running at a stable speed. Epic Adventures will help you see your Minecraft world differently from what you have ever had before, and it will fill you with hope and imagination. Once you have the resource pack installed and loaded into your new, existing, or old Minecraft world, you will want to start your action-adventure right now. Epic Adventure Resource Pack is a great structural resource pack that Minecraft players cannot afford to miss. It will bring you exciting and exciting adventures. In particular, the designer Toby109TT is ready to help and fix this resource pack if you need it. We hope that you will have a great experience playing this resource pack. Download Links: epic adventures resource pack
-
SEUS Renewed Shaders Mod 1.14.4/1.12.2 adds a beautiful lighting effect to the game and many more exclusive features. Features: Improved GI and SSAO Super smooth Temporal Anti-Aliasing Completely reworked system for day/night cycle based on atmospheric scattering Accurate sunlight color via atmospheric scattering Accurate ambient sky lighting from atmospheric scattering via Spherical Harmonics New atmospheric scattering on distand land for a natural sense-of-scale New underwater rendering Normal/bump mapping from torch/artificial light Screen-space shadow tracing for better contact shadows Vastly improved performance with long render distance settings Physically-based specular highlights from sunlight Improved 2D clouds Improved rendering of stained glass New rain/wet effects End and Nether shaders Improved POM and POM self-shadowing Improved shadows Many more, too many to list here! Download Links: seus renewed 1.16.4
-
Falling Tree 1.16.4, 1.16.3, and 1.15.2 is a mod that will allow us to cut down all the wood of a tree with only one of the blocks of the tree, regardless of what position that block of wood occupies in the tree. It allows you to break a full tree by only breaking one log off of it. Sneaking will disable this functionality. This functionality will allow us to gain a lot of time, and comfort, when it comes to collecting wood for our constructions or for our object manufacturing processes. Features: logs_whitelisted: The mod automatically supports all blocks identified as logs. However if you want to manually add another kind of block (because it isn’t identified as a log, or because you make trees out of obsidian) under the form mod_id:block_id (eg: biomesoplenty:fir_log). tools_whitelisted: The mod automatically supports all axes as tools. However if you can manually add more (because it isn’t identified as an axe, or because you want to break your trees with a special tool) under the form mod_id:item_id (eg: powder_power:axe_trilium). logs_blacklisted: If you want to disallow some blocks to be broken all at once, you can do so here (if a block is both present in the whitelist & blacklist, the blacklist will win). tools_blacklisted: If you want to disallow the use of some tools, you can do so here (if an item is both present in the whitelist & blacklist, the blacklist will win). ignore_durability: If activated breaking down a tree won’t damage your tool. max_log_count: The maximum number of log a tree can be made of (if more the mod won’t apply). preserve_tools: If this option is enabled your tool won’t be broken by chopping down a big tree, it’ll instead be left with 1 of durability. reverse_sneaking: If this option is enabled you’ll need to sneak in order to break the whole tree. break_leaves: If this is set to true, leaves will despawn instantly when a tree is broken (even if not cut in one shot). Download Falling Tree Mod falling tree mod
-
Minecraft Download projectLUMA Shaders Mod - Mod to change Minecraft graphics
wminecraft posted a topic in Other Games
projectLUMA Shaders Mod is a mod for Minecraft with a graphical change function, developed inspired by KUDA, to provide the best possible visuals with minimal impact on the performance of your computer. The purpose of projectLUMA Shaders Mod is to maintain beautiful graphics while still not affecting gaming performance. Minecraft is a game of magic blocks famous for highly interactive and creative gameplay, as well as the classic 8-bit graphics style. Brightly colored squares, shading systems and "superficial" lighting are the game's unique features and attractions, but a lot of gamers dislike such graphics. Therefore, many graphic mods were developed and born. If other Minecraft Mods focus on adding new features and items to the game world, the Shader mod focuses on improving the graphics background by tweaking light effects, colors, water balloons, tree shadows ... ., helping Minecraft's graphics become more sparkling, more sophisticated and more player-friendly. projectLUMA Shaders Mod is one of the most notable graphic mods today, designed for Minecraft Shaders Mod (OptiFine). It is the official successor mod of KUDA-Shaders. The purpose of projectLUMA Shaders Mod is to help gamers experience Minecraft games without the impact of distracting gameplay effects, and most importantly with minimal impact on computer performance while still maintains beautiful graphics. Outstanding features of projectLUMA Shaders Mod: - Skybox and realistic water waves. - Sunlight effect at dusk. - Reflex. - Support PBR. - Surroundings. Download : projectluma -
Minecraft Better End Mod 1.16.5/1.16.3 (End Revamped, Dimension Improvements)
wminecraft posted a topic in Other Games
Better End Mod 1.16.5/1.16.3 revamps one of the most important part of the game, being the End Dimension. Upon defeating the Ender Dragon, beyond Ending the Game, players are rewarded with a gateway to the deeper End. However, the End dimension often bland and lacklusting, showcasing almost nothing but fellow Endermans, End Blocks and nothing more, whereas the Overworld and the Nether are currently filled with wonders and bizarre landscapes. With the addition made by Better End Mod, the aforementioned Dimension will be revamped completely using unique terrains, flowers and entities. The new splendid End can be described as nothing less than breathtaking. Nevertheless, despite however beautiful a location may be, the threats it pose are still considerably large so be careful of what you wish for. How to install: Download and Install Minecraft Launcher Vanilla Download and Install Fabric Installer for Vanilla Launcher Run recently downloaded .jar file, choose the version you want and press “Install.” Run Minecraft, select the profile with Fabric installed and press Play Press Start on Desktop Choose Run Type %appdata% onto Run and press Enter. Goes into Roaming/.minecraft/mods Put the jar. Files onto the mod folder and run Minecraft. Download Links: better end mod -
Minecraft’s basic appeal is its ability to build anything and turn the game into whatever you want. The Minecraft mod world is huge and full of talented modders that push the limits of the game in new and creative ways. The default game has three dimensions, as we know it in the introductory Minecraft series: The afterlife (the world you start to resemble ours), Nether (one dimension is like a hell filled with unique fire, rocks and mobs) and The End (a purgatory ultimate level where the game’s final boss, Ender Dragon is found). A library of Minecraft game mods like MicdoodleCore is really nothing more. This version you can freely choose the version you love. Not only that, the game mod also supports the smoother experience of other mod versions. Micdoodlecore is in Galacticraft also known as the Galacticraft Mod. As you are going to the moon Galacticraft introduces the Space Race into Minecraft. You’ll find new ores in the Overworld, a new recipe for crafting mission controls and rockets, and you’ll use all of this new technology to launch rockets that take you to both the Moon and Mars(with an API that allows mod makers to create more planets and solar systems for you to explore) as well as the asteroid belt and World Space station, you can customize and expand. Notable points are in MicdoodleCore – Where to gather previous mod versions. If you have spent a lot of time looking for Minecraft mod versions with many interesting experiences, MicdoodleCore is what you need most right now. This is a version that actively supports players when creating a library full of game mods. It should be noted that players need to have a scientific arrangement and appropriate classification otherwise it will be very easy to confuse. – Improved operation. Playing some Minecraft mod game version, players can clearly feel the smoothness when starting MicdoodleCore simultaneously. With this version, it will help you login easily through minimizing the steps, limiting the error of game display, stuck and incorrect data display. – Easy to use MicdoodleCore is user-friendly when it’s easy to install and use. You can zoom in or out as you like with easy-to-follow settings. The control keys designed to help gamers easily observe. Minimum configuration required to play MicdoodleCore – Windows XP, Vista, 7, 8, 8.1, 10 operating system – RAM: 2GB A mod version that many gamers are interested in is RealWorld Mod that allows players to feel a more interesting, colorful Minecraft world.The context in the RealWorld Mod has been redesigned in the direction of editing color schemes, details. The scene is extremely lively. Even though many mods were released, until now, the original Minecraft of Mojang still has no substitute. Many gamers still stick with and do not want to add or remove any content about the game in Minecraft because they want to have the original pristine without mixing. Download Links: micdoodlecore
-
Litematica Mod is a new schematic mod written from scratch and is targeting light (client-side) mod loaders like LiteLoader on 1.12.x, Rift on 1.13.x and Fabric on 1.14+,1.16+. The default hotkey to open the in-game config GUI is M + C. If you are for example on AZERTY keyboard layout instead, then the keys are different, and M + C becomes, + C instead, etc. Note: If you have Optifine installed, then there are some options that you most likely will need to disable in Optifine HD, or otherwise it will break the schematic rendering: Render Regions needs to be disabled Shaders need to be set to OFF, or alternatively disable VBOs in the vanilla Video settings, and disable both the ‘schematicOverlayModelOutline‘ and ‘schematicOverlayModelSides‘ options in the Visuals category Fast Render might also need to disable if there is still some weird HUD/GUI rendering issues. and The main feature of a schematic mod is to display a “hologram” version of a structure, which shows you exactly how to build the structure and where to place the blocks. It also includes a (configurable) overlay to highlight missing, extra or wrongly placed blocks. Litematica also includes a nice Material List, including a Material List HUD, to help you collect the materials needed for the build. There is also a Schematic Verifier feature, including an overlay, which you can use to scan the entire schematic area and look for any mistakes. This can be extremely useful especially with technical/redstone builds, where tiny mistakes can break everything. There are also several Creative-mode-only helper features, such as Fill, Replace, Delete and also a Paste mode for “pasting” schematics into the world (immediate/direct in single player, using /setblock commands in multiplayer). Download Links: litematica 1.16.5
-
SEUS (Sonic Ether’s Unbelievable Shaders) is a shaderpack for Minecraft to be used with OptiFine or GLSL Shaders Mod (legacy). SEUS Renewed is a reinvention of the legacy versions of SEUS that brings you quality visuals at a reasonable performance using traditional rasterization-based rendering methods. There are some unreleased development versions of SEUS Renewed, but most of my development time lately goes into developing SEUS PTGI. SEUS PTGI is an experimental version of SEUS that includes a totally custom software implementation of ray tracing that does not require an RTX graphics card and will work on any NVIDIA graphics card (though low-end cards may struggle with performance. AMD compatibility is still being worked on). The “PTGI” in the name stands for “Path Traced Global Illumination”, which is the main feature of this project. It also includes ray traced reflections. SEUS PTGI is still very much in an alpha state, and therefore is not yet ready for public release. However, if you’d like to support the development of this project and would like to test out experimental versions, head over to my Patreon page for more information. SEUS is an ongoing project! Follow me on Twitter for the latest development news. How to install Make sure you have installed Minecraft Forge Download Optifine HD and GLSL Shaders Mod. Download the mod for your version of the game. Locate the minecraft application folder. On windows open Run from the start menu, type %appdata% and click Run. On mac open finder, hold down ALT and click Go then Library in the top menu bar. Open the folder Application Support and look for Minecraft. Put it in the ‘mods’ folder, which is located in the game folder. Enjoy Download Links: seus renewed 1.16.4